Manual
Login
Our 3D CAD supplier models have been moved to 3Dfindit.com, the new visual search engine for 3D CAD, CAE & BIM models.
You can log in there with your existing account of this site.
The content remains free of charge.

Top Links
Manual
 |
- 4.12.2.1. Tabbed page "General"
- 4.12.2.1.1. Dialog box for role selection - plinkgroups.cfg -> Block [Role name] -> Keys "DESC" and "IMAGE"
- 4.12.2.1.2. Preferred ranges - plinkgroups.cfg -> Block [Role_name] -> Key "PREFRANGE"
- 4.12.2.1.3. Display condition for parts selection - Colored catalog index - plinkgroups.cfg -> Block [Role_name] -> Key "CONDITIONTREE"
- 4.12.2.1.4. Viewing condition for table rows - plinkgroups.cfg -> Block [Role_name] -> Key "TABRESTRICTION"
- 4.12.2.1.5. Show table row but hide LinkDB content - plinkgroups.cfg -> [Role_name] -> Key "CONDITION"
- 4.12.2.1.6. Columns to be displayed - plinkgroups.cfg -> Block [Role_name] -> Key "VARSUSED / VARSHIDDEN"
- 4.12.2.1.7. Export condition - plinkgroups.cfg -> Block [Role_name] -> Key "EXPORTRESTRICTION"
- 4.12.2.1.8. Export information (tooltip) at status lights - plinkgroups.cfg -> Block [Role_name] -> Key "TOOLTIPTEXTEXPORTON" / "TOOLTIPTEXTEXPORTOFF"
- 4.12.2.1.9. Release certain directories for export - plinkgroups.cfg -> Block [Role_name] -> Key "EXPPRJTAB" / plinktemplates.cfg
- 4.12.2.1.10. Hide catalogs - plinkgroups.cfg -> Block [Role name] -> Key "HIDELIST"
- 4.12.2.2. Tabbed page "PDM"
- 4.12.2.3. Tabbed page "Display"
- 4.12.2.4. Request ERP number per e-mail
- 4.12.2.5. Tabbed page "Translations"

After selection of the category Roles you can see ...

![[Tip]](/community/externals/manuals/%24%7Bb2b:MANUALPATH/images/tip.png)
Syntax notes can be found under Section 6.1.1, “Fortran Syntax ” or Section 6.1.2, “SQL Syntax ”.
In some input fields Fortran syntax has to be used, in some SQL syntax. The respective note is found above each point.
-
Specify variables with their table name in addition.
ERPTABLE.ERP_PDM_NUMBER
LINKTABLE.ACTIVE_STATE
For complex expressions use brackets. Unneeded brackets are ignored. In case of doubt, too many brackets are better than too few brackets.
-
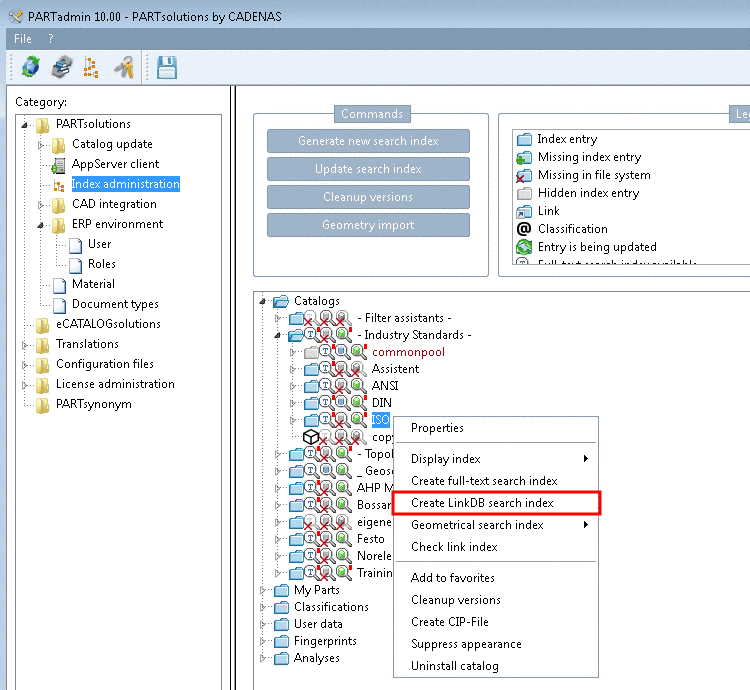
Please remember to update the link database search index in case of relevant changes of role settings.