Manual
Login
Our 3D CAD supplier models have been moved to 3Dfindit.com, the new visual search engine for 3D CAD, CAE & BIM models.
You can log in there with your existing account of this site.
The content remains free of charge.

Top Links
Manual
 |
![[Note]](/community/externals/manuals/%24%7Bb2b:MANUALPATH/images/note.png) |
Note |
|---|---|
Status indicating bitmaps for table view is role dependent, so has to be defined for each role separately. | |
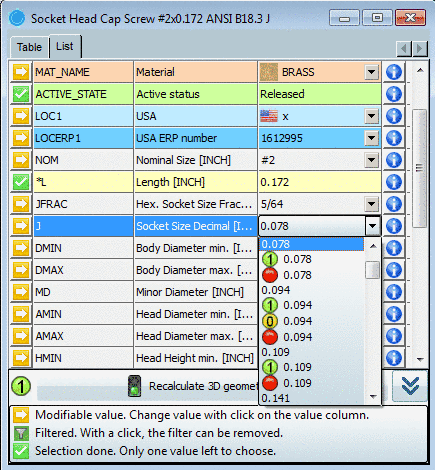
Parts (characteristics) can be marked in different ways in the characteristic attribute table and thus give messages: "Preferred part", "Export possible", "Available at different locations", etc. Not only standard green/red status icons are possible, but any number of different icons can be used.
Status icons (e.g.


 ) can merely be indicating but also be related to an
Export restriction. See below.
) can merely be indicating but also be related to an
Export restriction. See below.
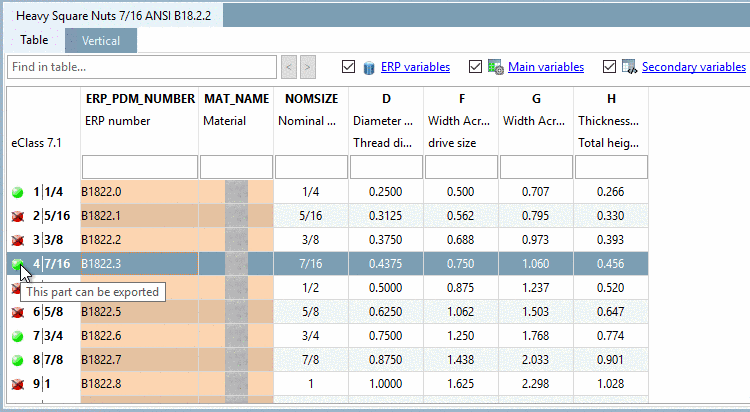
Status indicating icons in the PARTdataManager table view - Example with standard status icons in green/red. Here, the status icon is related with an export restriction in addition. Parts where the icon shows green may be exported to the CAD-System. Parts where the icon shows red can not be exported to the CAD system.
Another meaningful rule could be:
Dark green    = Already usesd at all locations
Middle green  = Already used at two locations
Light green   = Already used at one location
Gelb          = Not used at any location, but with ERP number
Rot           = Does not match any condition (possibly combinded with export restriction)
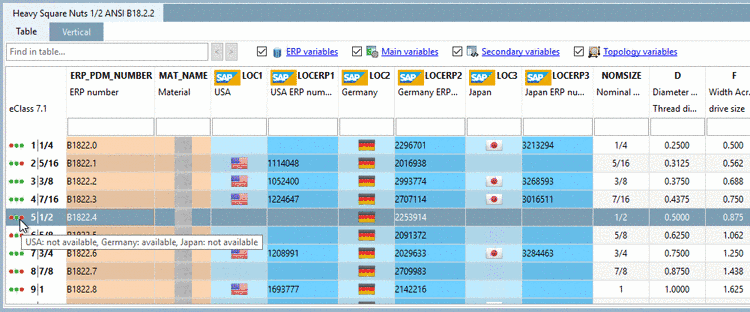
Status indicating icons in the PARTdataManager table view - Example with extra icons in different colors and specific messages. When moving the mouse over an icon a tooltip is displayed (if provided).
Copy the used bitmaps into the $CADENAS_SETUP/bitmaps directory.
Maximum bitmap size is 16 x 16 px.
You can assign as many conditions to status lights (colors and symbols) as you wish.
Setting in
configuration file $CADENAS_SETUP/plinkgroups.cfg:
Block [<role name>], key BMPCONDITION<NUMBER>, first value contains condition, second value contains bitmap path, third value contains tooltip (optionally)
[LOC1] BMPCONDITION0="((LOC1.EQ.'x').AND.(LOC2.EQ.'x').AND.(LOC3.EQ.'x'))","$(CADENAS_SETUP)/bitmaps/state_green_circle_3.png","ALL LOC" BMPCONDITION1="((LOC1.EQ.'x').AND.(LOC3.EQ.'x').AND.(LOC2.NE.'x'))","$(CADENAS_SETUP)/bitmaps
Meaning: If each of the "LOC1" AND "LOC2" AND "LOC3" column contain a 'x', then the condition is fulfilled. Then the bitmap defined in the Bitmap column is shown.
In the Tooltip column you can optionally insert a placeholder. This term is automatically inserted in the translation table on the Translations tabbed page. There, you can insert as many translations as you like. Now, in PARTdataManager, when you move the mouse cursor over a status icon, the translation is displayed.
![[Tip]](/community/externals/manuals/%24%7Bb2b:MANUALPATH/images/tip.png) |
Tip |
|---|---|
If you like to comprehend the example, please see the settings in the PLDBDEMO database, in the role "LOC1". | |
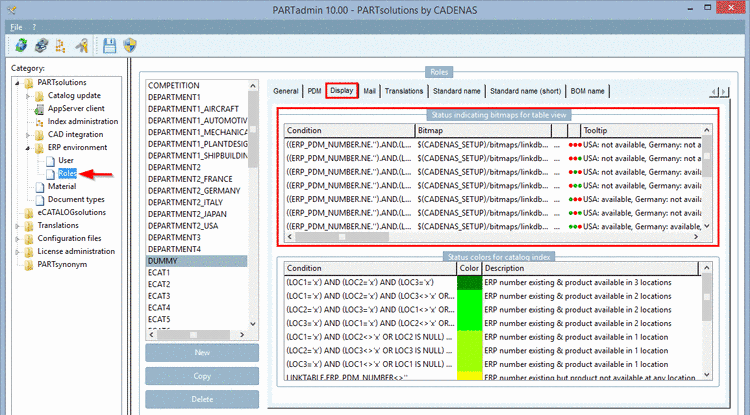
Setting in user interface under PARTadmin -> category Roles -> tabbed page Display -> dialog area Status indicating bitmaps for table view:

Setting in
configuration file $CADENAS_SETUP/plinkgroups.cfg:
[DUMMY]
BMPCONDITION0="((ERP_PDM_NUMBER.NE.'').AND.(LOC1.NE.'x').AND.(LOC2.NE.'x').AND.(LOC3.NE.'x'))",
"$(CADENAS_SETUP)/bitmaps/linkdbdemo/department/trafficlight_location/rrr.png",
"USA: not available, Germany: not available, Japan: not available"
|
Tip |
|---|---|
If you like to comprehend the example, please see the settings in the PLDBDEMO database, in the role "DUMMY". | |
Setting in user interface under PARTadmin -> category Roles -> tabbed page Display -> dialog area Status indicating bitmaps for table view
Example 3 with complex condition:
Syntax with CONTAINS, FALSE, TRUE and linking of several conditions:
(CONTAINS(NB,'DIN').EQ..FALSE.).AND.(CONTAINS(NB,'bolt').EQ..TRUE.).AND.D.LE.8
Using 'AND' the following three conditions are linked:
A blue star is chosen as icon.

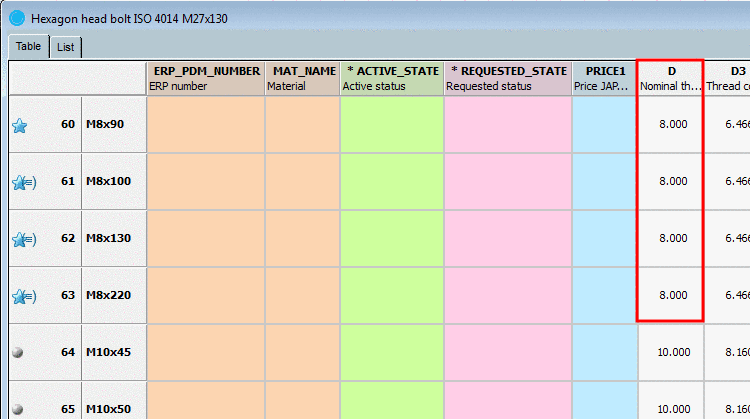
Result in PARTdataManager: ISO bolts with diameter lower or equal than 8 are marked with the chosen icon.
Combinations of Export condition and Status indicating bitmaps for table view
You can combine settings used under General tabbed page -> Export condition and Display tabbed page -> Status indicating bitmaps for table view:
Status indicating bitmaps for table view can also be used if Export condition is not used.
Status indicating bitmaps for table view and Export condition are basically two different functions which however can interact.
The following shows the possible combinations:
-
Export condition used in the General tabbed page AND no Bitmaps function:
=> The red-green status bitmaps are shown.
Meaning: If the condition, which is inserted under Export condition, meets, then green is shown; if not, then red is shown.
See Section 4.12.2.1.7, “ Export condition - plinkgroups.cfg -> Block [Role_name] -> Key "EXPORTRESTRICTION" ”.
-
Export condition in the General tabbed page not used AND no entries under Bitmaps:
-
Export condition in the General tabbed page not used AND Bitmaps function used:
=> You can use as much bitmaps (colors) as desired. There is no export restriction.
-
Export condition in the General tabbed page used AND Bitmaps function used:
=> You can use as many bitmaps (colors) as you like. There is a export restriction. Only parts which meet the export condition may be exported. Please regard that the condition under Export condition and the condition under Bitmaps work together.


|
Note | |||
|---|---|---|---|---|
Whether an export restriction is given depends on the setting under tabbed page General -> Export condition. A detailed description on how to set up the rules can be found under Section 4.12.2.1.7, “ Export condition - plinkgroups.cfg -> Block [Role_name] -> Key "EXPORTRESTRICTION" ”. | ||||
