Manual
Login
Our 3D CAD supplier models have been moved to 3Dfindit.com, the new visual search engine for 3D CAD, CAE & BIM models.
You can log in there with your existing account of this site.
The content remains free of charge.

Top Links
Manual
 |

Under Extras select the command Configure ERP environment.
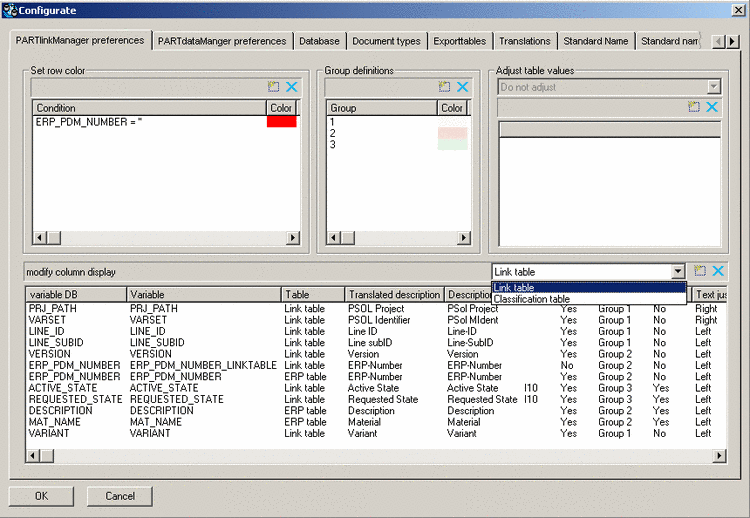
The dialog window is divided in the following areas:
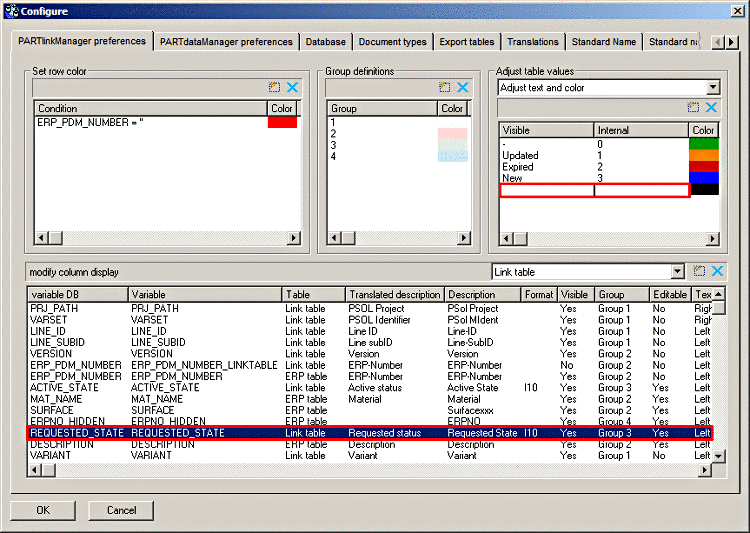
--> Choosing the PARTlinkManager preferences tab the Configure window opens. In the Variable DB column you see all columns with their database name.
New applied columns get the same name as PARTsolutions internal variable name (Variable column) as default-value, by which they are applied to database, too.
![[Note]](/community/externals/manuals/%24%7Bb2b:MANUALPATH/images/note.png) |
Note |
|---|---|
|
This name could be changed user-defined, but it is not recommended. Pay attention, that exactly this name is used for all operations within PARTlinkManager and PARTadmin. | |


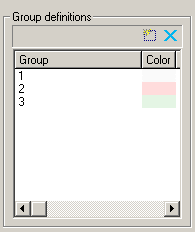

Clicking on the color fields, a dialog displays. Define your personal settings.
|
Example 2: Adjust color with condition Here, depending on the used material, different text colors are assigned. The specific display of prices is possible as well: PRICE>0.5 |

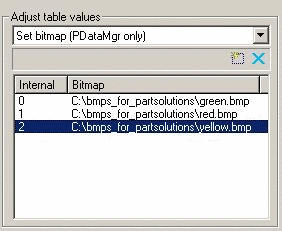


In this case the laughing smiley signalizes, that "ACTIVE_STATE" is on „released“.
The crying smiley signalizes that "ACTIVE_STATE" is on "locked".
Of course you can use more serious figures, too.
For example: You could signalize the belonging to a certain project in an own column.
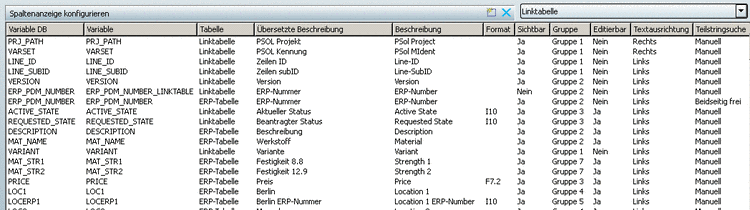
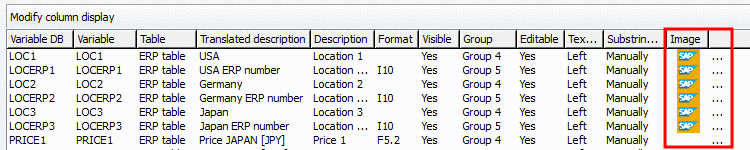
In the Modify column display dialog area all Link table columns are listed underneath each other and can be configured in this view.


|
Note |
|---|---|
|
Adding and deleting of lines (columns) concerns the internal PARTsolutions configuration. At this place there is no access to the database. The column display can contain columns, that are not applied in the database for LINKTABLE and/or ERPTABLE (therefore there is an error message during login). In such cases, the according columns must be deleted (here in Modify column display). Creating of database columns directly from PARTsolutions is described under Section 5.7.3.1, “ Adding database column ”. Detailed information on creating database tables via scripting is found under Section 5.2.3.1, “Installations script ”. | |
| Column | Meaning |
| Variable DB (used in the database) |
With an SQL query via select * from ERPTABLE these table names, amongst others, show up. |
|
Is used in the PARTdataManager as bold written main column name.
The PARTsolutions modules work internally with this description (name).
|
|
|
Table corresponds either to the LINKTABLE or the ERPTABLE. Newly applied columns are usually entered into the ERPTABLE. |
|
| Translated description |
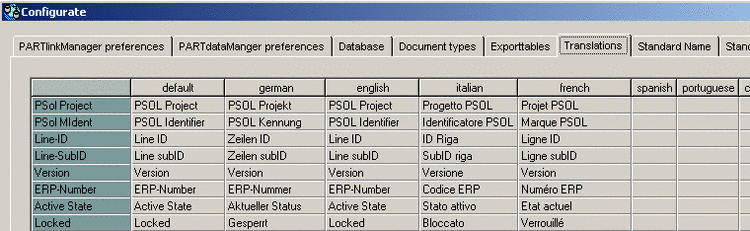
Display under PARTlinkManager -> Extras -> Configure ERP environment -> Translations tab defined translations in the respectively active language.[a]
|
|
If there is no translation entered for the active language under PARTlinkManager -> Extras -> Configure ERP environment -> Translations tab, the text under Description will be used. |
|
|
A10: Text string with a length of 10 characters; (valid for data type CHAR and VARCHAR. Input is not required.) F5.3: Number with 5 pre-decimal places and 3 post-decimal places (valid for data type DECIMAL.) I10: Integer with max. 10 places (valid for data type INT and SMALLINT). |
|
|
Visible corresponds to the visibility of the columns used in the main window of the PARTlinkManager. These can be set to yes or no in the selection window. |
|
|
|
|
|
In the main window of the PARTlinkManager you will see the button . Via this button you reach the window Edit row, in you can work on the fields of the database. |
|
|
Option: left or right catches column contents that do not completely fit into the field (for example, in the column PSol project the end of the path is displayed). |
|
|
...corresponds to the search function in the PARTdataManager: Manually: In order to find the expression "G23" in the string "AUG329422" for example, the search entry must be defined as "*G32*". Free both sides : For this setting, the entry "G32" is enough and leads to the desired results. |
|
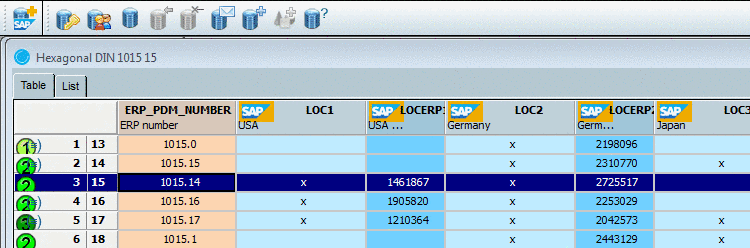
| Image |
You can use icons in the column
header of characteristic attrbute tables in
PARTdataManager. In this way you can mark columns with
third party information (SAP for example). By clicking on
the search button an explorer
window opens. Select the desired icon. Default storage
path is
|
[a] See also under Section 5.9.1.3.3.2.5, “ Translations tab ”. | |


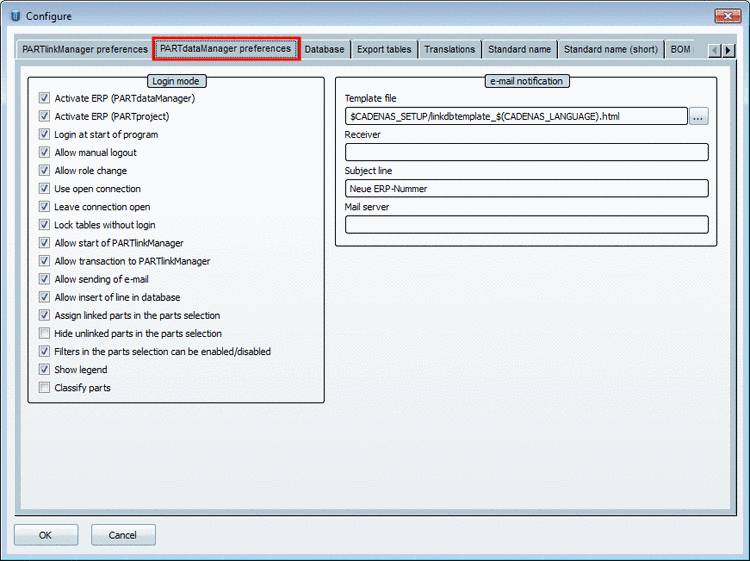
PARTlinkManager -> Extras menu -> Configure ERP environment menu item -> Configure dialog box -> PARTdataManager preferences tabbed page -> Login mode section
In the section Login mode on the one hand the login mode is controlled, on the other hand at the same time it is defined whether the related button in the ERP toolbar is shown or hidden.
|
Note | ||||
|---|---|---|---|---|---|
|
| |||||

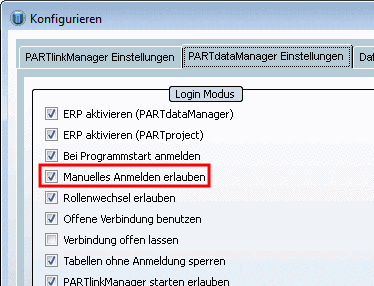
Activate ERP (PARTdataManager): ...has to be checked in order to be able to work with the ERP integration in PARTdataManager.
-
Login at start of program: PARTdataManager does not open until you logged in (Login dialog box).
-
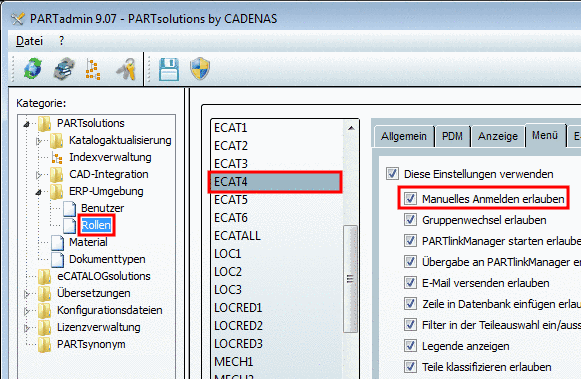
Allow manual logout: ...enables manual login so that different users can be used.
If this option is activated the button Log on to link database
 is visible in the ERP toolbar. Whether the button
is activated in addition depends on the role specific setting in
PARTadmin. On this compare under ???.
is visible in the ERP toolbar. Whether the button
is activated in addition depends on the role specific setting in
PARTadmin. On this compare under ???. -
Allow role change: ...enables changing of role/group.
If this option is activated the button Select group
 is visible in the ERP toolbar. Whether the button
is activated in addition depends on the role specific setting in
PARTadmin. On this compare under ???.
is visible in the ERP toolbar. Whether the button
is activated in addition depends on the role specific setting in
PARTadmin. On this compare under ???. -
Leave connection open: ...indirectly concerns questions of licensing. The license fee depends on the number of users (accessing the database at the same time). When the connection is closed after each request, licenses can be saved. Disadvantage is that it takes time always to connect again.
Lock tables without login: ....means that it is necessary to be logged in to be able to work with PARTdataManager. When the option is deactivated, then PARTdataManager can be used without ERP connection.
-
Allow start of PARTlinkManager: ..enables starting PARTlinkManager.
If this option is activated the button Launch PARTlinkManager
 is visible in the ERP toolbar. Whether the button
is activated in addition depends on the role specific setting in
PARTadmin. On this compare under ???.
is visible in the ERP toolbar. Whether the button
is activated in addition depends on the role specific setting in
PARTadmin. On this compare under ???. -
Allow transaction to PARTlinkManager:
-
Allow sending of e-mail: Via e-mail you can request the release of the currently selected part at the standardization department for example.
If this option is activated the button Request ERP number per e-mail
 is visible in the ERP toolbar. Whether the button
is activated in addition depends on the role specific setting in
PARTadmin. On this compare under ???.
is visible in the ERP toolbar. Whether the button
is activated in addition depends on the role specific setting in
PARTadmin. On this compare under ???. -
Allow insert of line in database: ... enables launching an input window in order to link a part to an ERP_PDM_NUMBER.
If this option is activated the button Add dataset to link database
 is visible in the ERP toolbar. Whether the button
is activated in addition depends on the role specific setting in
PARTadmin. On this compare under ???.
is visible in the ERP toolbar. Whether the button
is activated in addition depends on the role specific setting in
PARTadmin. On this compare under ???.Note This does not automatically allow to use the part, because it can be prevented by other settings (see status light / export restriction).
-
Assign linked parts in the parts selection:
Details on the setting options for the index tree are found under Section 5.6.5.2.1, “ Tabbed page "General" ” und Section 5.6.5.2.4, “Tabbed page "Display" ”.
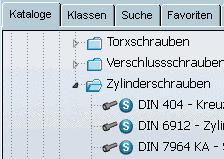
Hide unlinked parts in the parts selection: ...can be used, when the function Preferred rows on/off is not used. When activated only linked parts are displayed. All red directories and parts are hidden. On this compare the two figures at next point.
-
Show legend: Dataset is either „Locked“, „Released“ or „Expired“. Via HTML stylesheet the legend can be enhanced.
If this option is activated, the button Show legend
 is visible in the ERP toolbar. Whether the button
is activated in addition depends on the role specific setting in
PARTadmin. On this compare under ???.
is visible in the ERP toolbar. Whether the button
is activated in addition depends on the role specific setting in
PARTadmin. On this compare under ???. -
Classify parts: ... enables classification of projects in PARTdataManager. Detailed information on this is found under ???.
If this option is activated, the button Classify project
 is visible in the ERP toolbar. Whether the button
is activated in addition depends on the role specific setting in
PARTadmin. On this compare under???.
is visible in the ERP toolbar. Whether the button
is activated in addition depends on the role specific setting in
PARTadmin. On this compare under???.


|
Template file: The recipient receives a pre-configured email. The template is found under: \\cadenas \ partsolutions\ software \ setup \ linkdbtemplate_german.html. |

|
Receiver: Is automatically inserted, as soon the adjoining window is called by Request ERP number per e-mail button: |

Subject line: ....refers to the subject line of the sent email.
Mail server : Mail server, which is responsible for the email delivery
|
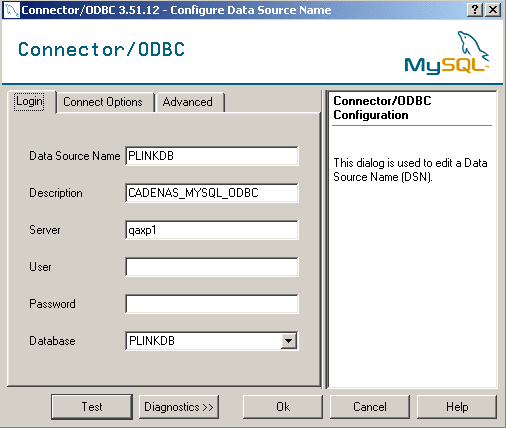
Under ODBC database that name has to be inserted, which is used in the ODBC-configuration, too. (see adjoining fig.). |
|
-
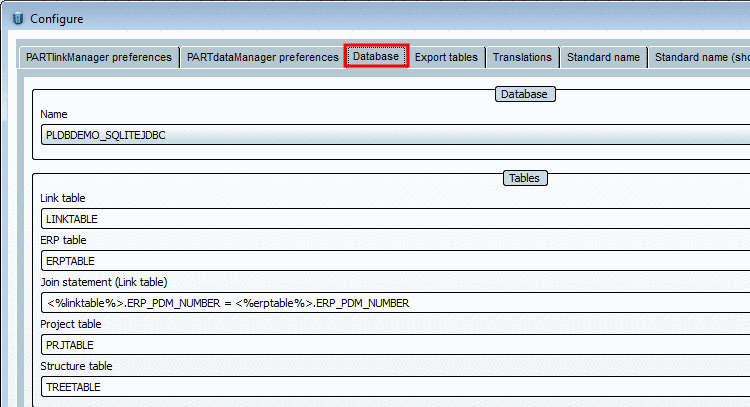
Do not edit the following entries! The entries are in the plinkcommon.cfg file under $CADENAS_SETUP.
-
Join statement defines, which primary key is assigned to which foreign key in the LINKTABLE and ERPTABLE. In this case „erp_pdm_number“.
-
PRJTABLE is used for the function Edit project table (see Section 5.9.1.6.7, “ Edit project table ”).
-
The TREETABLE is needed in order to display the red-green status in the directory tree. As of V9 this is necessary due to the new index structure (especially because of links).
Using the "status light" (PARTadmin > Role > General > Export condition) only parts on "green" are exportable.
Using Export tables you can set on "green" any further directories. This could be directories, which only contain PDFs and for reasons of information shall be marked or directories, which indeed do not contain parts with ERP_PDM_NUMBER, but anyhow shall be exportable.
At first choose in PARTlinkManager under Extras > Configure ERP environment > the Export tables tab.
|
Note |
|---|---|
|
A notice will show up, if you are not connected to the LinkDB via an administrative right. More information under: Section 1.1.7.6.24, “plinktemplates.cfg ”. | |
Then add a table name with "Add entry".
The following figure exemplifies EXPTAB.
Choose a directory via explorer window.
Here exemplified „agathon“ under "Projectfolder".

Now switch to PARTadmin and insert the before applied table name in the „Use export table“ field using the desired role in the category tree.


If new terms are created on the PARTlinkManager preferences index page - for example through the application of a new column in the Modify column display or Adjust table values area - an entry is automatically established in PARTlinkManager on the Translations index page.
The entry shows up in the blue column.
You may set translations for any CADENAS languages.
Via Standard name, Standard name (short) and BOM name insert fields the NB and LINA display in PARTdataManager can be modified and the CAD file name can be created.
Standard name: If nothing is specified here, the standard NB is used, like it is specified in the *.tac- or *.tab-file. This would be adequate to the entry "NB=$NB".
BOM name: ...refers to LINA . If nothing is specified here, the "BOM" is used, as specified in the *.tac or *.tab file.
If nothing is specified here, the standard-SHORTNB is used, like it is specified in the *.tac or *.tab file. This would be adequate to "SHORTNB=$SHORTNB".
Because NB is used for the CAD-file by default, the SHORTNB suits for CAD systems, which name length is restricted.
![[Important]](/community/externals/manuals/%24%7Bb2b:MANUALPATH/images/important.png) |
Important |
|---|---|
|
The creation of file names has been simplified for standard applications without ERP connection with V9. The entire CAD
administration, including the definition of file names now can be carried
out via CAD configuration files under When an ERP
connection is used either the NB / LINA display within PARTsolutions and
the creation of file name can be modified. The chapter in hand describes
this possibility. If adjustments have been carried out here then other
adjustments via | |
The creation of the CAD file names gains more importance through ERP functionalities.
The name rule is defined in PARTlinkManager in the menu Extras -> Configure ERP environment -> register Standard name (as a rule).
|
Note |
|---|---|
The tab Standard name is found in the PARTadmin module. There, a role dependant name rule may be defined, which is not usually practical! | |
There exist the following possibilities for the creation of CAD file names:
-
Define Standard name / Standard name (short) / BOM name on the corresponding register page
As a rule the Standard name (possibly the Standard name (short)) is used to create names.
The standard description is shown in the title of the 3D display in the PARTdataManager.
With ERP integration it is important to create the name from the ERP_PDM_NUMBER (material master number).
-
If the standard description goes along with the name rule, the standard description can also be adjusted based on projects.
-
For very complicated name rules, you can fall back on scripting.
Launching the external script is carried out via NB=TSCRIPT('nb.ruletable','$CALCED_ROW.','$NB.').

In each case, enter the ground rule into the dialog area of the corresponding register page.
If there is no explicit intervention at the Standard name tab page, then the name is automatically created with the NB (Standard name).
The entry NB=$NB would be appropriate.
Enter a name rule when you want to create the standard description and thus the CAD file in a specific way.

If there are different resistances, surfaces, etc., for geometrically identical parts, the name creation should factor this in.
e.g.: Creating the file name from the standard description and material.
Names assembled in this way can quickly call up an exceeding number of maximally allowed symbols.
A possible solution is to set the creation of the name via the ERP_PDM_NUMBER. Especially since it is usually unique.
The disadvantage of the non-speaking name can be balanced in combination with the "SHORTNAME".
NB=(’$ERP_PDM_NUMBER._$SHORTNB.’)
A specification may also be used:
IF ('$ERP_PDM_NUMBER.'.EQ.'')THEN
Means: in case no ERP_PDM_NUMBER exist, the standard description will be used, otherwise the ERP_PDM_NUMBER.
Slight modification of example 4:
IF ('$ERP_PDM_NUMBER.'.EQ.'')THEN
Meaning: In case an ERP_PDM_NUMBER exists, the standard NB is used, otherwise the ERP_PDM_NUMBER + NB.
You can use if-specifications, Fortran syntax, constants, and ERP variables (launch with '$variable name'), for name creation for the definition of the Standard name and therefore the CAD file name:
Detailed information about the syntax can be found under Section 7.1, “Constants, Functions, Operators, mathematical expressions ”.
If the options in the entry field do not suffice, you can generate a reference to a vbs script and work with complex conditions.
Set the entries under Standard name, Standard name (short) or BOM name.

In the example, the script is called nb.vbs and is located under …/setup/scripts/common.
The opened function is here called "ruletable".
function ruletable(table,calced_row,orgNB)
  result=""
  mmrow=cint(calced_row)
  if mmrow >= 0 then
     tmp=table.NN
     normbezeichnung=table.rows.item(mmrow).resolvevariables("$NB.",0)

'0.************************************************
    pos=Instr(1,normbezeichnung,"DIN")
    if pos = 1 then
       result=tmp+"_"+table.rows.item(mmrow).resolvevariables("$NENN.$MAT_NAME.",0)
    end if

'1.************************************************
    if tmp="DIN 912" then
       result="ISO4762abcd"+"_"+table.rows.item(mmrow).resolvevariables
       ("$NENN.$MAT_NAME.",0)
    end if

'2.************************************************
    if tmp="DIN 2448" then
       result="DIN 2448"+"_"+table.rows.item(mmrow).resolvevariables
       ("$D._$S._$L.___$MAT_NAME.",0)
    end if

'3.************************************************
    if tmp="DIN 2576" then
       result=tmp+"_"+table.rows.item(mmrow).resolvevariables
       ("$NENN._$D1.$MAT_NAME.",0)
    end if

'4.************************************************
    pos=Instr(1,normbezeichnung,"FAG")
    if pos >= 1 then
       result=table.rows.item(mmrow).resolvevariables("$NB.",0)
    end if

'5.************************************************
    pos=Instr(1,normbezeichnung,"EO EL L-Verschraubung mit Dichtkegel")
    if pos >= 1 then
       result=table.rows.item(mmrow).resolvevariables("$ERP_PDM_NUMBER.",0)+
       "-EL"+table.rows.item(mmrow).resolvevariables("$ROHR.$S.",0)
    end if

'6.************************************************
       if tmp="DIN 7993-B 2" then
       result=table.rows.item(mmrow).resolvevariables("$ERP_PDM_NUMBER.",0)+
       "-A"+table.rows.item(mmrow).resolvevariables("$D1.",0)+"---DIN7993"
    end if

' *************************************************

    if result="" then
      result=orgNB
    end if

  end if
  ruletable=result
end function
