powered by CADENAS

Categories

Search FAQs

  •  
  •  

Most Recent FAQs

Most Viewed FAQs

FAQs

  • Log in with your access data and click on the button "settings".   Click on "Change Password".   En...
      1. Log in with your access data and click on the button "settings".


      2. Click on "Change Password".


      3. Enter your old password first and then the new password . Confirm the data by clicking the button "Change Password".


      4. You will receive the confirmation „Settings were successfully saved“.


        -> Password has been changed.

  • On this free portal (PARTcommunity) there are no standards available but all other catalogs.To receive standard parts you may switch to o...

    On this free portal (PARTcommunity) there are no standards available but all other catalogs.
    To receive standard parts you may switch to our chargeable software PARTsolutions.

    For information about this visit http://www.cadenas.de/strategisches-teilemanagement/motivation .


    PARTsolutions offers additional advantages:

    - over 500 catalogs
    - central establishment of CAD data
    - ERP connection
    - PDM / PLM connection
    - no internet access required
    - customizing to your requirements<!--?xml:namespace prefix = "o" ns = "urn:schemas-microsoft-com:office:office" /-->

    100% users marked this FAQ as helpful.
    |
    Was this answer helpful?
    3 votes
  • Click on the flag right above on the open portal.   -> A dropdown-menu opens showing all available languages. &nbs...
    1. Click on the flag right above on the open portal.


      -> A dropdown-menu opens showing all available languages.


    2. Click on the preferred language.

      ->The language has been changed.

    100% users marked this FAQ as helpful.
    |
    Was this answer helpful?
    1 vote
  •  Client requirements Browser: IE >= v8 Firefox >= v3 Opera >= v10 Javascript and Cookies...

     Client requirements

    • Browser:

      • IE >= v8

      • Firefox >= v3

      • Opera >= v10

    • Javascript and Cookies must be activated.

    • Java applet JRE >= 1.6

    • ActiveX viewer: ActiveX must be activated in the security settings.

    • CADENAS PARTwebViewer must be installed.

      Should this not be installed, the following message will show up in the CAD model preview dialog area.

      CADENAS ActiveX-Viewer could not be started

      CADENAS ActiveX-Viewer could not be started

    • Note
      Please note the installation query in the browser window. You must click on it in order to allow for the installation of the CADENAS ActiveX-Viewer.

    • Flash v10
      In order to create a sketch under Search for CAD models -> Sketch 2D, you need the Flash-Player.

    0% users marked this FAQ as helpful.
    |
    Was this answer helpful?
    1 vote
  • Please check the following points: - does the part look like the 3D preview of the portal?- is the part also wrong in other export forma...

    Please check the following points:

    - does the part look like the 3D preview of the portal?
    - is the part also wrong in other export formats(e.g. STEP)?


    If your problem could not be solved please contact the support team 

    via Ask Question in the FAQ area.


    1. Click on Support and afterwards on Ask Question.

      -> A dialog opens with a form for inputting your question.

    2. Please describe the problem exactly and click on Ask, to send the request.


    100% users marked this FAQ as helpful.
    |
    Was this answer helpful?
    3 votes
  • Click on classification.. -> a drop down menu opens. Click in the drop down menu on certified catalogs. ->...
    1. Click on classification..

      -> a drop down menu opens.

    2. Click in the drop down menu on certified catalogs.

      -> Only catalogs are shown which have got the quality seal gold or silver.

  • You probably have reached the daily download limit, your account is not activated or the tickets are not enabled for your account. Pleas...

    You probably have reached the daily download limit, your account is not activated or the tickets are not enabled for your account.

    Please contact CADENAS support or the support of the partner portal directly.

    79% users marked this FAQ as helpful.
    |
    Was this answer helpful?
    14 votes
  • You are using an emailaddress from a freemailer?Emailaddresses hosted by so called freemailers eg. @freenet., @gmail. and so on,are gener...

    You are using an emailaddress from a freemailer?

    Emailaddresses hosted by so called freemailers eg. @freenet., @gmail. and so on,
    are generally blocked for security- and/ or costsreasons by some catalogsproviders.
     

    In case you do not use a freemailer, please take into account:

    Other providers enable the download generally after emailauthentification.

    ! If you want your emailaddress to be unblocked please contact the catalogprovider directly !


    Attention: 

    Please check if the website is not blocked generally by some internal securitypolicies
    at your site. Please make sure, that *cadenas.de and (!) *partserver.de and (!) *partcommunity.com is listed under "trusted sites" in your browsersettings!

    100% users marked this FAQ as helpful.
    |
    Was this answer helpful?
    2 votes
  • ORIGAMI SIMULATOR    ( 2017 )   DEMO HERE This WebGL app simulates how any origami crease pattern will fol...

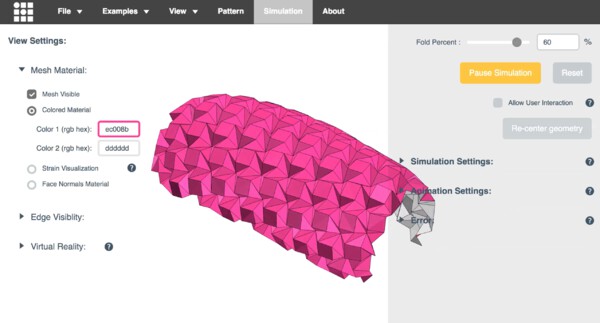
    This WebGL app simulates how any origami crease pattern will fold. It may look a little different from what you typically think of as "origami" - rather than folding paper in a set of sequential steps, this simulation attempts to fold every crease simultaneously. It does this by iteratively solving for small displacements in the geometry of an initially flat sheet due to forces exerted by creases. It calculates the geometry of folded or partially folded origami using a dynamic, GPU-accelerated solver; the solver extends work from the papers Origami Folding: A Structural Engineering Approach and Freeform Variations of Origami. It also supports an immersive, interactive VR mode using WebVR. More information about the solver and the app is being compiled into a paper and will be posted here soon. 

    Live demo here, code on Github.

    GIF

    The Origami Simulator lets you simulate how any crease pattern will fold in 3D. Try it here.

    GIF

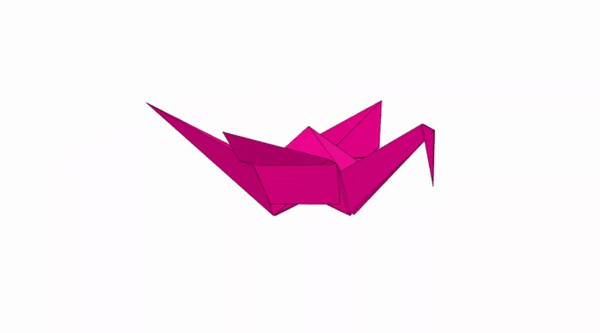
    Folding a traditional crane in one step in the Origami Simulator.

    Crease patterns are uploaded into the app in SVG or FOLD formats. SVG crease patterns use color and opacity to set the direction and final fold angle of each crease. These patterns are triangulated and modeled as pin-jointed truss networks with additional angular constraints in the solver. At each step of the simulation, the displacements of nodes in the origami are calculated and used to update the visualization.

    GIF

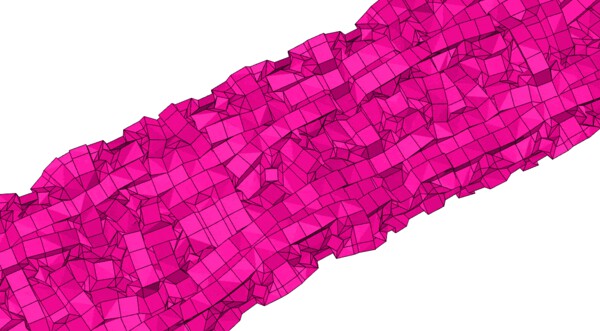
    This crease pattern was generated by Maze Folder, an app by Erik DemaineMartin Demaine, and Jason Ku that creates crease patterns for any raised maze on a square grid. Based on the paper Folding Any Orthogonal Maze by the same authors.

    This app uses a compliant dynamic simulation method to solve for the geometry of an origami pattern at a given fold angle. The simulation sets up several types of constraints: distance constraints prevent the sheet from stretching or compressing, and angular constraints fold or flatten the sheet. Each of these constraints is weighted by a stiffness - the stiffer the constraint, the better it is enforced in the simulation.

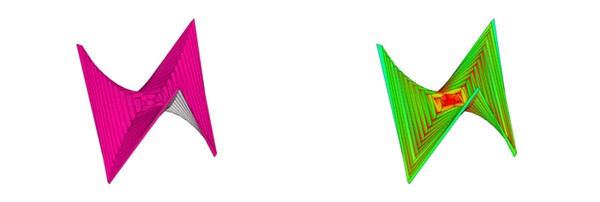
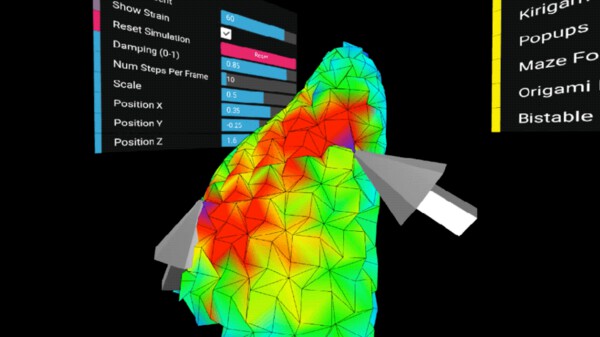
    Cauchy strain or engineering strain is a unitless measurement of how much a material is being stretched or compressed under load. The app can be put into a strain visualization mode that illustrates the strain across an origami sheet by mapping it to a color from blue (no strain) to red (max strain). Visualizing strain gives a sense of how much the distance constraints in the origami pattern are being violated (i.e. how much the sheet is being stretched). The strain at each vertex is evaluated by averaging the percent deviation of all its distance constraints with adjacent vertices. This deviation is reported as a percent of the total length of the distance constraint to remove scaling effects.

    Strain map of folding waterbomb tessellation. The pattern tends to curl to minimize internal strain in the material.

    GIF

    Six-Pointed Hypar variant with strain map. This model was triangulated in an alternating asymmetric hinge triangulation based on the paper (Non)existence of Pleated Folds: How Paper Folds Between Creases.

    GIF

    Direct interaction with a Huffman Waterbomb tessellation in virtual reality. This app connects to virtual reality hardware via the WebVR api. In this mode, you can visualize the mesh folding in 3D and interact with it directly. Grab the mesh with both hands to see how it moves and watch internal strain propagate through the model. A longer VR demo video is on YouTube.

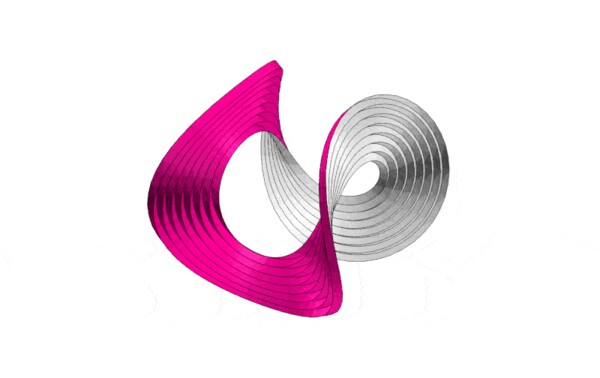
    Typically, origami patterns are made from many straight creases, but by using curved creases it's possible to create more organic forms. Curved creases are simulated in the app by discretizing them into many small, straight segments - according to the paper Curved Folding.

    GIF

    Harmonics of a circular pleat origami, eventually resting in a low frequency configuration.

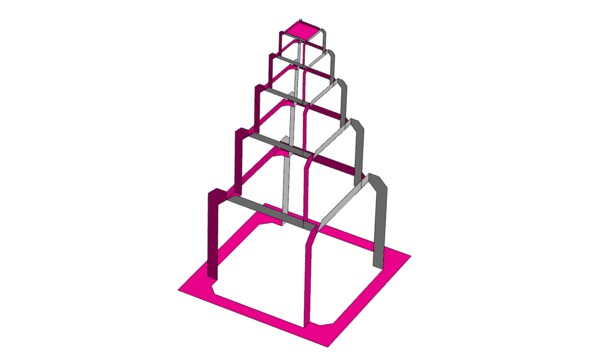
    Kirigami is a variation on origami that incorporates cuts into a folding pattern. Many "popup" patterns used in cards or books are examples of kirigami. Green lines in crease patterns are treated as cuts when imported into the app. Left is a crease pattern for a Miyamoto Tower by Happy Folding, middle and right are popup designs by Popupology.

    GIF

    Miyamoto Tower kirigami pattern designed by Yoshinobu Miyamoto. Crease pattern from Happy Folding.

     
    All images 
  • We deliver CAD-data, only. We do NOT sell any hardware!

    We deliver CAD-data, only. We do NOT sell any hardware!

    100% users marked this FAQ as helpful.
    |
    Was this answer helpful?
    2 votes
  • If you don't find the desired CAD model, you can let CADENAS know which your preferred catalog is. Therefore proceed as follows:  ...

    If you don't find the desired CAD model, you can let CADENAS know which your preferred catalog is. Therefore proceed as follows:
     

    1. Make sure that you are in the dialog area 3D CAD CATALOGS and then search for the required CAD model.


    2. Click on the link Nothing found?.


      -> A window opens. 

    3. Fill out the form.


    4.  Click on Submit in order to send your preferred catalog. 

  • Please add the domains *.partcommunity.com  *.partserver.de  to your list of trusted websites:  eg. Internet Explor...

    Please add the domains

    *.partcommunity.com 

    *.partserver.de 

    to your list of trusted websites:
     

    eg.

    Internet Explorer -> Tools -> Internet Options -> Security -> Trusted Sites


    Alternatively you can also try to use a different browser.

    Contact your local IT for help changing settings if necessary!
     

    If the proposals do not work please contact the support of the partner portal directly, because sometimes Free mail addresses like abc@gmx.de are blocked by our partner portals.

    X

  • As soon as a CAD model has been selected, in the dialog area CAD model preview the Dimension diagram tabbed page show...

    As soon as a CAD model has been selected, in the dialog area CAD model preview the 
    Dimension diagram tabbed page shows the 2D views.

    Note 
     

    Always a default dimension view is displayed (created for a middle row) and this may differ from your selected part.
     

    1. Under Actions click on Dimension diagram to get 2D views of the chosen part.


    2. Click on Dimensioning views.


    3. By clicking on a Preview you can select the desired dimensioning view.


      Note

      By clicking on Dimensioning views again you can hide the preview selection. 


    4. In the toolbar, move the mouse pointer over the icons in order to receive information about the icons.
       

  • Follow the steps listed below to define the characteristic of the part:  Make sure that you are in the dialog area 3D CAD ...

    Follow the steps listed below to define the characteristic of the part:
     

    1. Make sure that you are in the dialog area 3D CAD CATALOGS and search for the required part.

    2. At directory level  select product groups as long as a concrete assembly  or concrete single part  has been specified and choose an assembly or a single part.
       

    3. Define the characteristic of the part, by clicking into the option field of the desired row.


      -> A default view of the selected model which may differ from the selected characteristic, is displayed under CAD model preview.

      Note

      If you want to view an exact replication of the characteristic, under  Actions click on Generate preview.
       

    4. Switch to the variable view by clicking on the part description.


    5. The variable view shows all important data of a specific characteristic in a compact form.


      -> Click on Back to return to the table view.


      Note

      For parts with value range fields, the variable view helps allocate the values.
  • 3D HTML graphics can be easily and quickly created for your own website with PARTcloud.net - feature offers engineers the possibility to ...

    3D HTML graphics can be easily and quickly created for your own website with PARTcloud.net - feature offers engineers the possibility to convert self-designed 3D CAD models in STEP or STL format with only three steps into a WebGL 3D HTML graphic.

    1. Upload your self-designed 3D CAD model for instance in STEP or STL format to www.partcloud.net

    2. Start the download of the 3D CAD model in WebGL HTML format

    3. You will receive a HTML file which you can integrate into your website


  • 1. Upload it to PARTcloud https://b2b.partcommunity.com/community/partcloud/index?route=upload-parts   2. Open Your 3D Model and ...

    1. Upload it to PARTcloud

    https://b2b.partcommunity.com/community/partcloud/index?route=upload-parts


    2. Open Your 3D Model and select WEBGL HTML as download format


    3. Open the downloaded .HTML file OFFLINE at any time inside your WEB browser

    Here is an example: 

    100% users marked this FAQ as helpful.
    |
    Was this answer helpful?
    1 vote
  • Under 3D CAD CATALOGS you have the possibility to define the level of detail.  Make sure that your are in the dialog area ...

    Under 3D CAD CATALOGS you have the possibility to define the level of detail.
     

    1. Make sure that your are in the dialog area 3D CAD CATALOGS
       

    2. On the right side under Actions, click on Edit CAD formats.


      ->
       The following dialog area shows up: 
       

      • Generation options (Level of Detail)

      • Selected Formats (Add CAD formats)


    3. Define the Level of Detail.


      Note
       
      The setting refers to the CAD model.
      The display in the 3D view is always "high".

    4.  Confirm your entries with Save

      -> The level of detail has been changed. 
    33% users marked this FAQ as helpful.
    |
    Was this answer helpful?
    3 votes
  • Follow the steps listed below to send a CAD model to your e-mail address.  Make sure that you are in the dialog area 3D CA...

    Follow the steps listed below to send a CAD model to your e-mail address.
     

    1. Make sure that you are in the dialog area 3D CAD CATALOGS and navigate to the required part.
       

    2. In the dialog area Download CAD models under Edit CAD formats -> Add CAD formats, select the transfer mode email by clicking into the option field. Then define one or more CAD formats and confirm your entries by clicking on Save.


      -> The view returns to the dialog area Generation options / Selected formats. Confirm your entries by clicking on Save.
       

    3. Under Actions, click on Generate CAD MODEL.


      ->
      The information dialog Generating CAD models opens.


      Note

      All formats selected under Download CAD models (dialog area 3D CAD CATALOGS) -> Edit CAD formats ->Selected Formats are generated. 

      As long as the generation is running, is shown. 


    4. As soon as the generation has completed, you will get informed by the note Check your emails that the component was sent by e-mail.


      If you close this window, further CAD models can be selected.
       

      Furthermore all generated CAD models are listed under Download CAD models.


      In the column Actions, the following icons are displayed:
       

      •   Remove: By clicking on the link you can remove parts from the list, which are no longer                                                        needed.
         

      •   Info: Specific part information
         

    5. After clicking on the link Info specific part information is displayed:
       

      • Preview image

      • Part description

      • Status information about generation

        Generation in progress

        Generation successful

        Generation not successful. A corresponding error message shows up.


      •   Status information concerning e-mail distribution

      • Formats:

        All formats activated under Download CAD models (dialog area 3D CAD CATALOGS) -> Edit CAD formats -> Selected formats are generated and listed here now.
         

        For some formats you can get some CAD specific information by clicking the Info-Icon .

        The same Info icon you can find underDownload CAD models -> Actions.
         

      • Level of Detail

      • Generation date

      • Language

      •   to overview all currently available models.
         

    In order to import models into the CAD system, do the following:
     

    1. Open your e-mail account.

    2. Temporarily save the attached ZIP file anywhere.

    3. Unpack the files with WINZIP or a similar program.

    4. Import the file into your CAD system.

      For some formats, you can receive some CAD specific information by clicking on the Info icon  under Formats.

    50% users marked this FAQ as helpful.
    |
    Was this answer helpful?
    2 votes
  • Follow the steps listed below to download a CAD model:  Make sure that you are in the dialog area 3D CAD CATALOGS and navigate ...

    Follow the steps listed below to download a CAD model:
     

    1. Make sure that you are in the dialog area 3D CAD CATALOGS and navigate to the required part.
       

    2. In the dialog area Download CAD models under Edit CAD formats -> Add CAD formats, select the transfer mode download by clicking into the option field. Then define one or more CAD formats and confirm your entries by clicking on Save.


      -> The view returns to the dialog area Generation options / Selected formats. Confirm your entries by clicking on Save.
       

    3. Under Actions click on Generate CAD model.


      -> The information dialog Generating CAD models opens.


      Note

      All formats selected under Download CAD models (dialog area 3D CAD CATALOGS)
      -> 
      Edit CAD formats -> Selected Formats are generated. As long as the generation is running is shown.
        

    4. As soon as the generation has completed, the CAD models can be downloaded in this window directly. For this click on Download.


      If you close this window, further CAD models can be selected.

      Furthermore all generated CAD models are listed under Download CAD models.


      -> At the transfer mode CAD models to download, in the column Actions, the link text will be the following:
       

      • Download
         

      In addition the following is shown:
       

      • Remove: By clicking on the link you can remove parts from the list, which are no longer required.

      • Info: Specific part informations (see the next point).
         

    5. After clicking on the link Info specific part information is displayed:

      • Preview image

      • Part description

      • Status information about generation

        Generation in progress

        Generation successful

        Generation not successful. A corresponding error message shows up.


      • Status information about download

      • Formats:

        For some formats you can get some CAD specific information by clicking the
        Info icon .
        The same Info icon you can find under Download CAD models -> Actions.

      • Level of Detail

      • Generation date

      • Language

      • to overview of all currently available models.


    In order to import the models into the CAD system, do the following:
     

    1. Click on the Download link or the symbol .

      -> The File download window opens in order to determine the storage location.

    2. Temporarily save the attached ZIP file anywhere.

    3. Unpack the files with WINZIP or a similar program.

    4. Import the file into your CAD system.

      For some formats, you can receive exact CAD-specific information by clicking on the Info icon under Formats.

    0% users marked this FAQ as helpful.
    |
    Was this answer helpful?
    3 votes