Manual
Login
Our 3D CAD supplier models have been moved to 3Dfindit.com, the new visual search engine for 3D CAD, CAE & BIM models.
You can log in there with your existing account of this site.
The content remains free of charge.

Top Links
Manual
 |
The ERP Number Generator gives you the opportunity to set ERP numbers after a freely configurable key (prefix - number - postfix) - also possible for different catalogs, directories or projects.[94]
The following prerequisites must be met in order to use the ERP Number Generator:
Make sure your PARTsolutions version contains the "Sequencer" table "CNSSEQ". If needed, use the following corresponding command lines.
-
CREATE TABLE CNSSEQ (
  TOPIC VARCHAR(50) NOT NULL,
  PREFIX VARCHAR(50) NOT NULL,
  COUNTER INTEGER NOT NULL,
PRIMARY KEY(TOPIC,PREFIX,COUNTER)
);
grant all on dbo.CNSSEQ to public;
-
CREATE TABLE CNSSEQ (
  TOPIC VARCHAR(50) NOT NULL,
  PREFIX VARCHAR(50) NOT NULL,
  COUNTER INTEGER NOT NULL,
PRIMARY KEY(TOPIC,PREFIX,COUNTER)
);
grant all on dbo.CNSSEQ to public;
-
CREATE TABLE CNSSEQ (
  TOPIC VARCHAR(50) NOT NULL,
  PREFIX VARCHAR(50) NOT NULL,
  COUNTER INTEGER NOT NULL,
  PRIMARY KEY(TOPIC,PREFIX,COUNTER)
);
CREATE PUBLIC SYNONYM CNSSEQ FOR SYSTEM.CNSSEQ;
GRANT ALL ON CNSSEQ
Before you can use the ERP Number Generator you must make the appropriate settings in PARTadmin.
In PARTadmin, under CADENAS_SETUP open the
configuration file erpcustom.cfg in the dialog
area Category.
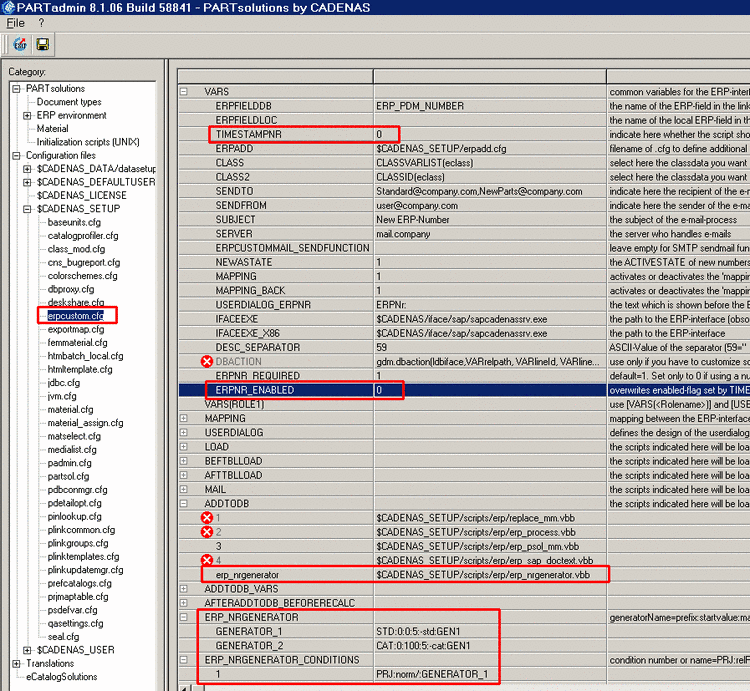
Now both keys ERP_NRGENERATOR and ERP_NRGENERATOR_CONDITIONS are used.
With both these keys you define the pattern after which the ERP numbers are to be generated.
Choose a part which does not yet have a number.

Click on
Add dataset to link database
 .
.
Please note: The entry field ERPNo is deactivated since the ERP number is automatically generated.

The number is inserted into the LinkDB according to the defined key and displayed in the attribute table.

The numbers are set consecutively, independent of settings for special catalogs or directories.
Prefix and
postfix are set specifically according to the setting in PARTadmin
in the configuration file erpcustom.cfg.
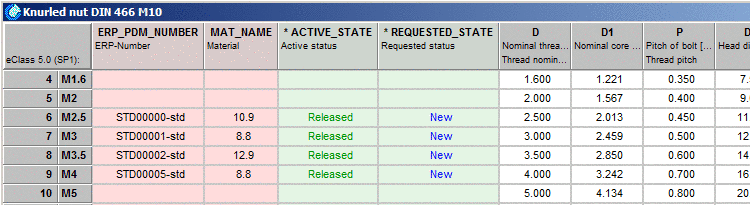
The parts with counters 00000, 00001 and 00002 were set consecutively in the standard parts catalog.
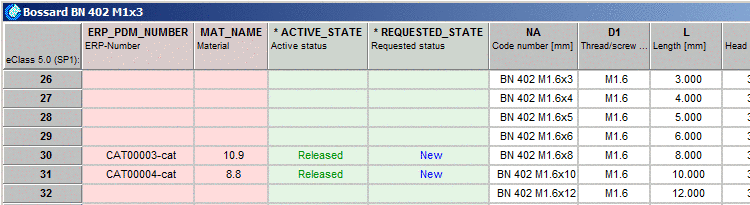
Afterwards, the counters 00003 and 00004 were set in the supplier catalog.
Then the counter 00005 is again inserted into the standard parts catalog.
The following figure shows the default setting.

The ERP_NRGENERATOR key, defines the generator names with the special generating pattern. You can attach as many variables as needed.
The EPR_NRGENERATOR_CONDITIONS key defines the related catalog, directory and project path for every generator.
The following table shows the syntax for the entry of the generating pattern and explains the meaning of the individual values.
Separators between individual values are colons.
In the standard environment two generating patterns (GENERATOR_1 and GENERATOR_2) are defined.
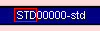
Example value for GENERATOR_1: STD:0:0:5:-std:GEN1
Example value for GENERATOR_2: CAT:0:100:5:-cat:GEN1
| Key name | Prefix | Minimum | Maximum | Place number | Postfix | Counter name |
| STD | 0 | 0 | 5 | -std | GEN1 | |
| CAT | 0 | 100 | 5 | -cat | GEN1 |
-
The name can be chosen as desired.
Please note that when specifying the path in the ERP_NRGENERATOR_CONDITIONS key, exactly this value is referenced to.
-
-
Shows maximum limit for the number generation
-
For an example value of '5', the '0' is shown as '00000'; the number '101', for example, as '00101'.
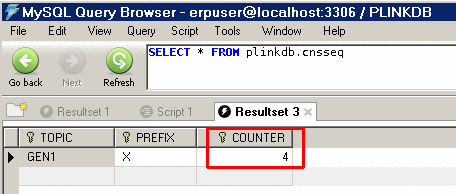
The following figure shows an example of a counter as seen for "Minimum", "Maximum" and "Counter name".
-
-
Name in order to differentiate between counters in the database table


The following table shows how to configure the requirements.
Separators between individual values are colons.
Requirements depending on roles
You can also define requirements based on user-role dependencies.
[ERP_NRGENERATOR_CONDITIONS(rolename)]
Via the context menu, launch Insert block. Insert the necessary key. Detailed information can be found under Section 1.1.7.3.5, “Edit blocks and keys”.
