Manual
Login
Our 3D CAD supplier models have been moved to 3Dfindit.com, the new visual search engine for 3D CAD, CAE & BIM models.
You can log in there with your existing account of this site.
The content remains free of charge.

Top Links
Manual
 |
After a part (assembly) is clearly determined you can export it to your CAD system.[84]
Export setting options: On this see Section 3.3.12, “"Export to CAD" tabbed page ”.
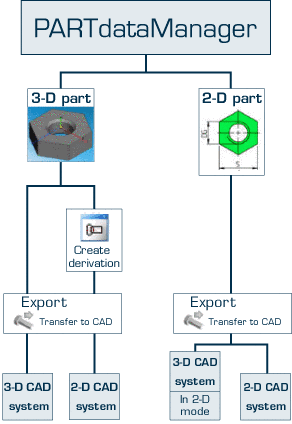
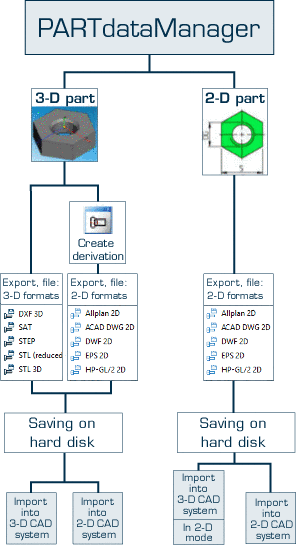
Export of 3D or 2D parts to 3D or 2D CAD systems
The following matrix gives notes regarding 2D derivation in the different combinations of 3D/2D part and 3D/2D CAD system.
| 3D CAD system | 2D CAD system | |
| 3D part |
Before exporting a 2D derivation has to be created. Without preceding 2D derivation an error message is displayed when attempting to export to your CAD system or the button Transfer to CAD is grayed out. Detailed information on 2D derivation can be found under Section 3.1.10, “ Create 2D derivation ”. |
|
| 2D part |
When exporting to 3D CAD systems please note that the respective CAD system has a 2D mode, which is active at the moment. |
Parts, already available in the 2D format can be exported without 2D derivation. |
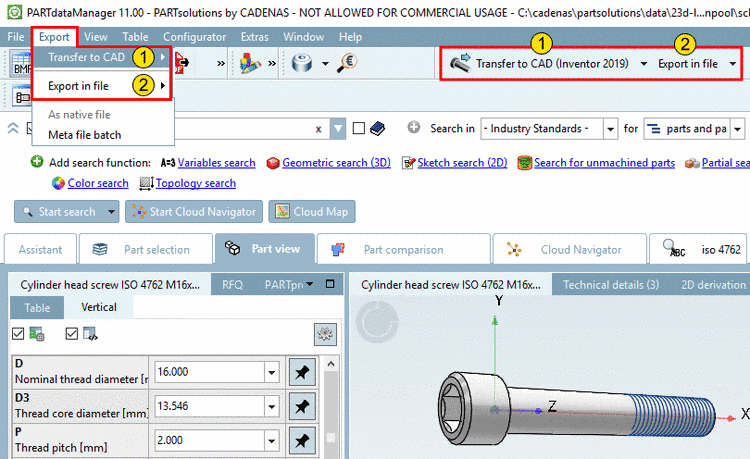
Export with and without PARTsolutions interface
Parts can be exported to the CAD with and without PARTsolutions interface.
The following figure shows the export
call
with
 and without
  PARTsolutions interface.
Export to a CAD system with PARTsolutions
interface
![[Note]](/community/externals/manuals/%24%7Bb2b:MANUALPATH/images/note.png)
Either in the
Export menu or in the toolbar, click on the
command Transfer to CAD  .
.
-> The chosen part is directly transferred to the CAD system. For special parts a placement dialog is available.[85] [86]
Information on all CAD interfaces (overview, the individual functions, the placement dialog, etc.) can be found under Chapter 2, Open PARTsolutions from CAD systems.
Export to a CAD system without PARTsolutions
interface
Even if your CAD system does not yet have a PARTsolutions connection, you still have the option to export parts from PARTsolutions to your CAD system. The respective part must first be exported onto your computer's hard drive. From there simply import it into your CAD system.


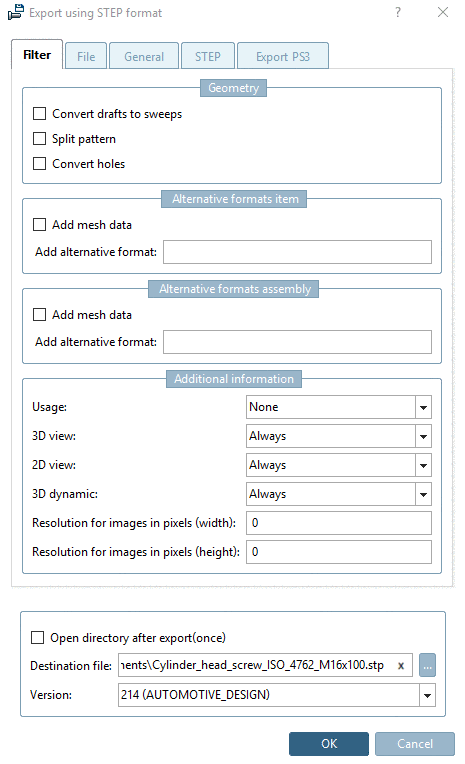
Detailed information on the individual formats is found under Section 3.1.9, “ Export into different file formats (without PARTsolutions interface) ”.
[84] For configurations make sure that there are no elements in red. These must then be assigned a specific characteristic.
[85] If a valid model is opened in the CAD system, then the button "Transfer to CAD" is automatically active in PARTdataManager.
[86] The button "Transfer to CAD" remains active, regardless of whether you call it from the PARTsolutions menu in the further course or you directly switch into the PARTdataManager.
