Manual
Login
Our 3D CAD supplier models have been moved to 3Dfindit.com, the new visual search engine for 3D CAD, CAE & BIM models.
You can log in there with your existing account of this site.
The content remains free of charge.

Top Links
Manual
 |
-
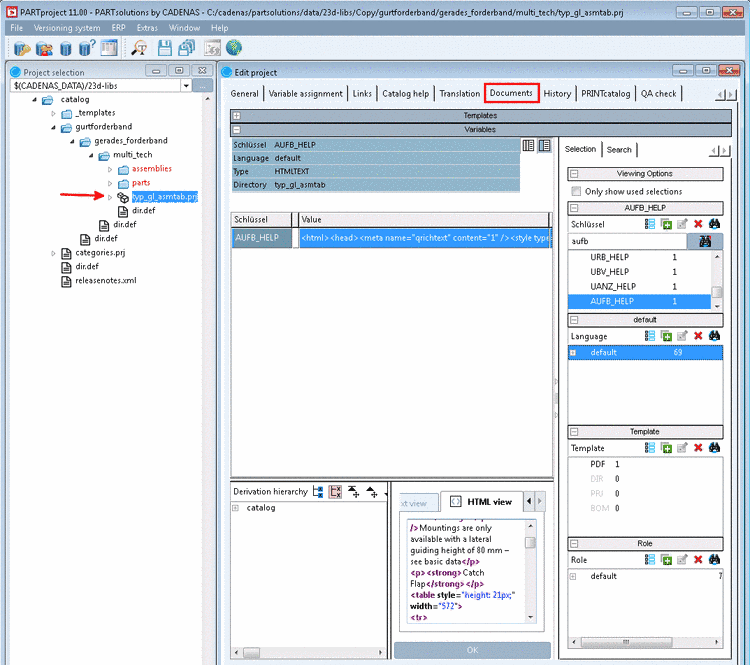
Under Project selection, select the project for which you want to create Media Variables.
Under Edit project, select the tabbed page Documents.
The working area has a lot of functions from which however, only a small part is needed.
Some important points, which will help to get you started:
-
On the right side, you can find the filter areas Key, Language, Template and Role, which can be opened or closed.
When clicking on the icon Choose nothing
 you can be sure that no filters are
accidentally set. Only the filters Key and Language are needed. You can close the
two others.
you can be sure that no filters are
accidentally set. Only the filters Key and Language are needed. You can close the
two others. The dialog area Derivation hierarchy is not needed normally. The selection is not relevant here.
-
Open the tabbed page HTML view. Only when clicking the displayed content is assigned to the selected key.
-
At first create the default language. That's why you have to select "default" under language. (Languages without content are shown grayed out.)
-
In the dialog area Key, click on the icon New Entry
 .
.When clicking on , the dialog box Insert entry is opened (as in each further case when creating a new Media Variable.
-
In the input field, enter the name of the Media Variable to be created.
The naming has to be done according to the following Schema:
Variablename_HELP
For a variable BNEB, you want to create a HELP variable: Then the name has to be BNEB_HELP.
-
In the list field, choose the option HTMLTEXT.
Only the option HTMLTEXT, may be DIR in addition, are needed for the creation of Media Variables.
-
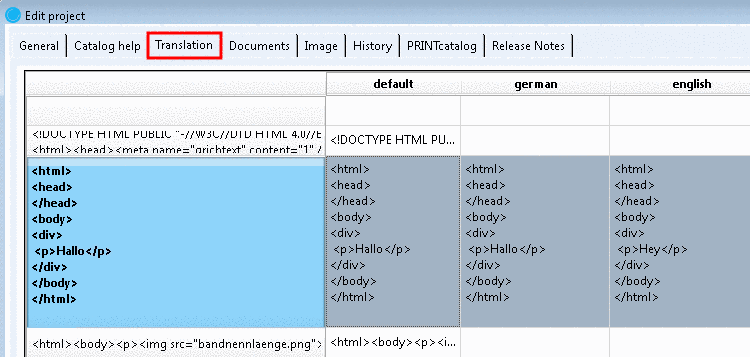
Translation: If translations shall be performed via tabbed page Translation in the course of the whole catalog translation, in any case activate the checkbox. Alternatively you could translate Media Variables on the tabbed page Documents only.
Publish: The checkbox should always be activated. Only deactivate for internal content which shall be excluded from generation.
-
Sort: This option should only be displayed if DIR is selected in the list field.
With the help of DIR you can create directories which can be used for sorting by moving Media Variables into them. For publishing sorting is not relevant. It only serves for a better overview.
-> In the first step, the new key is displayed grayed out. Only after assigning content, the key will be activated (and displayed in black color).
Numerical values behind the keys show how often the variable occurs (total number over all projects, languages, roles, etc.).
-
-
-
On the tabbed page HTML view enter the desired content.
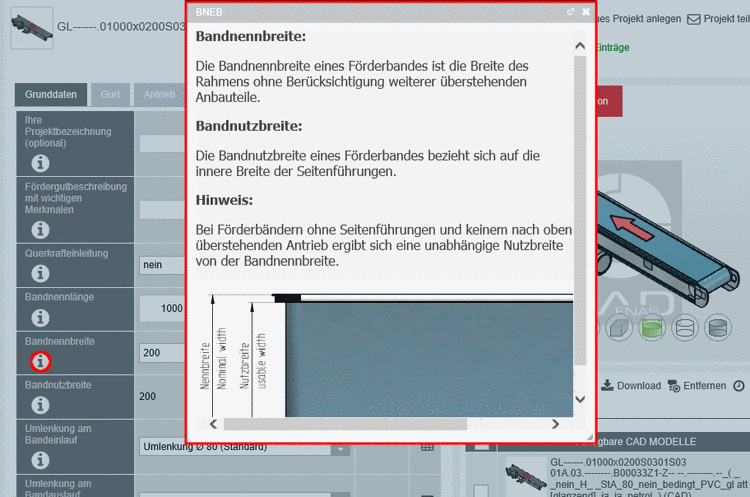
<html><head><meta name="qrichtext" content="1" /><style type="text/css">
p, li { white-space: pre-wrap; }
</style></head><body style=" font-family:'Tahoma'; font-size:12pt;">
<div>
p, li { white-space: pre-wrap; }
</style></head><body style=" font-family:'Tahoma'; font-size:12pt;">
<div>
<p>The conveying direction determines the belt inlet (start) and the belt outlet...
...
 ...</p>
<p><strong>Note</strong></p><p> ...
 ...</p>
<p><img src="bandbreiten.png" width="100%" height="auto" /></p>
</div>
</html>
...
...</p>
<p><strong>Note</strong></p><p> ...
...</p>
<p><img src="bandbreiten.png" width="100%" height="auto" /></p>
</div>
</html>![[Note]](/community/externals/manuals/%24%7Bb2b:MANUALPATH/images/note.png)
Note Do not use CSS and style information for elements (except in the <head>Tag).
You may insert pictures. These have to be stored in the same directory as the respective project file. Currently[a]relative paths are not supported.
For width and hight declaration use "width" and "height" tags. Pictures larger than 450px should have height=auto and width=100% (see above example).
[a] July 2017
-
-> The content is taken into the key.
For checking purposes scroll with the arrow keys.
-
In the project file, set the following entry in order to create the respective icon which calls the tooltip information.
INFO(BNEL)=BNEL_HELP
INFO(BNEB)=BNEB_HELP
etc.


After successful publishing you can have a look on the result in PARTcommunity.