Manual
Login
Our 3D CAD supplier models have been moved to 3Dfindit.com, the new visual search engine for 3D CAD, CAE & BIM models.
You can log in there with your existing account of this site.
The content remains free of charge.

Top Links
Manual
 |
In PARTproject -> context menu of root directory -> Automation -> Batch import neutral formats (Quick and Simple), call up the settings dialog box.

![[Note]](/community/externals/manuals/%24%7Bb2b:MANUALPATH/images/note.png) |
Note |
|---|---|
The license "ECATADDONS*NEUTRAL*IMPORTER" is required. If it is missing then the menu item Batch import neutral formats (Quick and Simple) is not displayed. | |
-> The same-named dialog box opens.

In the following the single setting options are explained:
-
-
Directory: Determine the catalog source directory via browse button .
-
By default, the CSV file should have been created with the following structure:
If the CSV file is exactly according to this scheme you do not have to perform any changes.
If the CSV rows show another sequence then please adjust the sequence via arrow keys

 .
. Recursive: If data shall be read from all directory levels then please activate this option.
-
-
-
The Neutral catalog is automatically created under $CADENAS_DATA/23d-libs/<catalog name>.
-
A standard license key with "QS" as catalog name looks like this, for example:
CNS2009*CATALOGS*QS
Corresponding entries in PARTproject are automatically set.
-
Determine whether you want an own project for each part or multiple parts (characteristics) shall be combined in the table.
-
Generate preview images (optionally)
Select this option if there are no own preview images available. These are automatically created then. (This only applies for preview images of projects, not for preview images of directories.)
If you use your own preview images then please regard that the option Generate preview images is activated.
-
-
Either define your own values by reference to variables of the CSV table or appropriate default values are automatically created.
-
If you use CSV files for the creation of your Quick&Simple catalog then you can use references to CSV file variables here.
-
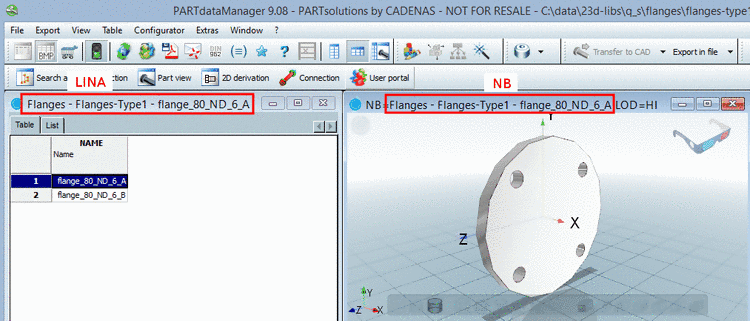
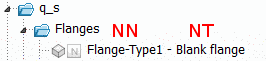
You can refer to a variable of the CSV file (here exemplified $NNCUSTOM. with the value "Flange-Type1").
The Standard number is displayed in PARTproject under -> Edit project -> Table file. See Fig. „ PARTproject -> Edit project -> Table file “.
Furthermore the Standard number is displayed in PARTdataManager in the index tree.
-
You can refer to a variable of the CSV file (here exemplarily to $NTCUSTOM. with the value "Blank flange").
The Standard title (=Standard text (NT)) is displayed in PARTproject under -> Edit project -> Table file.
Furthermore the Standard title is displayed in PARTdataManager in the index tree.
-
Default: Relative path of the input file.
You can refer to a variable of the CSV file (here exemplarily to $MATNR.).
The Standard name is displayed in PARTproject under -> Edit project -> Table file.
-
Here in the example in hand LINA also refers to $MATNR..
QS-$MATNR.
-
-
The following features of the input CSV files are not imported into the table
The following CSV file had been used, for example:
With the help of this option you can prevent variables from being displayed in the characteristic attribute table:
In the example in hand the table looks like this then:
-
Start the generation by clicking on .
-> A generation log is displayed.
Whenever parts could not be generated these are listed under Failed documents with an error description.
The following functions are available now:

Save log of the failed documents 
Import failed documents again 
Copy failed documents 
Move failed documents


![[Tip]](/community/externals/manuals/%24%7Bb2b:MANUALPATH/images/tip.png)


Open your generated Quick&Simple catalog in PARTdataManager.

