Manual
Login
Our 3D CAD supplier models have been moved to 3Dfindit.com, the new visual search engine for 3D CAD, CAE & BIM models.
You can log in there with your existing account of this site.
The content remains free of charge.

Top Links
Manual
 |

-
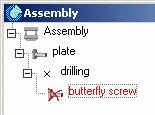
In the Connection part field, all parts which may be connected, and contained in the Configurator dialog area are listed.
If you mark one of these parts, their possible connection points are displayed in the Connection point field.
-
In the Connection part field, click on "butterfly screw" as well as in the Connection point field on expression "FS" and confirm your entries with .
--> Dialog area Configurator: The connection is now displayed by a connection line between the two Connection points.
--> Dialog area Assembly: The connection point boring has become part of the plate.
--> The 3D preview shows the Connection point as a green triangle .