powered by CADENAS

Manual

Manual

11.4. Small example from A to Z

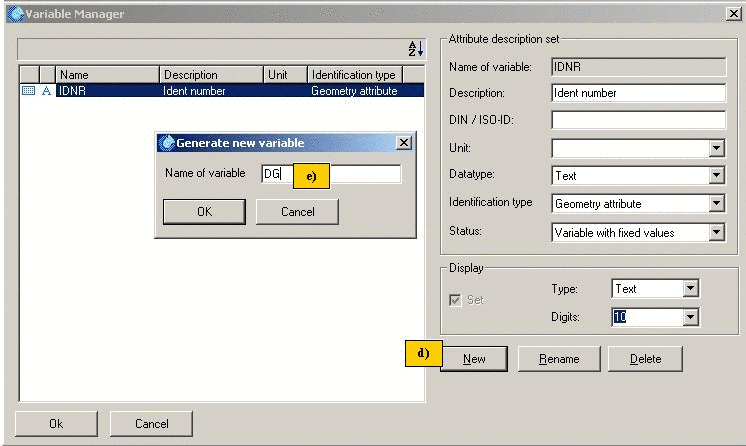
The following describes how an attribute table is created.

Do the following:

  1. In PARTproject create a new project.

    Mark the *.tab, bzw. *.tac file in the project you are going to work on.

    Click on Edit.

    --> The PARTeditor opens.

    In the already open PARTeditor, you can also apply a new attribute table viaFile -> New.

    [Note] Note

    If the QA mode is activated (PARTproject -> Extras -> Preferences... -> General -> Activate QA),opening or creating files directly in PARTeditor is not allowed. Editing must be started via PARTproject.

    In the QA mode the menu icons and buttons New and Open remain inactive, or an error message shows up.

  1. Set the variables (column headers) in the table.

    To do so, go to the Format menu and open the Variable manager.

  1. Click on the button New.

    --> The Generate new variable window opens. As a standard, the variable IDNR is already applied.

  2. Enter the desired Variable names (here DG).

  1. Set the corresponding Attribute description set. The unit "mm" is set as a default with the File type "number". The contents in the Unit and Description are transferred into the column subtitle in the table (see next point).

  1. In the same way, apply variable L and confirm with OK.

    --> The table only covers a total of three columns (IDNR, DG, L)

  1. Click in the relevant field and enter the required value.

  2. If you want to expand the table vertically, click on the button Add row.

  1. Make the required ID data before saving. The corresponding input window can be opened via the Format menu.

  1. On the basis of the character set in example NB=’Hexagon bolt ISO 4016 – M$DG.x$L.' , the following would then be seen in the header for this component in PARTdataManager:

[Note] Note
  • Please note the syntax in Standard name field.

  • The ID data window can only be exited via the OK, once all fields have been filled out.

  1. Save the table via File -> Save or Save as into the directory in which you have also applied the *.3db and *.prj file.