Manual
Login
Our 3D CAD supplier models have been moved to 3Dfindit.com, the new visual search engine for 3D CAD, CAE & BIM models.
You can log in there with your existing account of this site.
The content remains free of charge.

Top Links
Manual
 |
- 3.1.2.1.2.5.1. Export in AVI format
- 3.1.2.1.2.5.2. Export PDF (U3D) format
- 3.1.2.1.2.5.3. Export PDF datasheet
- 3.1.2.1.2.5.4. Export QR code
- 3.1.2.1.2.5.5. eClass Advanced
- 3.1.2.1.2.5.6. Export further "Others" formats
- 3.1.2.1.2.5.6.1. "Export options" tabbed page -> Export accuracy
- 3.1.2.1.2.5.6.2. "Cross-section" tabbed page
- 3.1.2.1.2.5.6.3. "Transformation" tabbed page
- 3.1.2.1.2.5.6.4. "Reduction" tabbed page
- 3.1.2.1.2.5.6.5. "Filter" -> Geometry tabbed page
- 3.1.2.1.2.5.6.6. "Collada options " tabbed page
- 3.1.2.1.2.5.6.7. "WebGL Html" tabbed page
|
The following "Others" formats are explained in an own section:
All other formats are summarized under Section 3.1.2.1.2.5.6, “Export further "Others" formats”: |
|

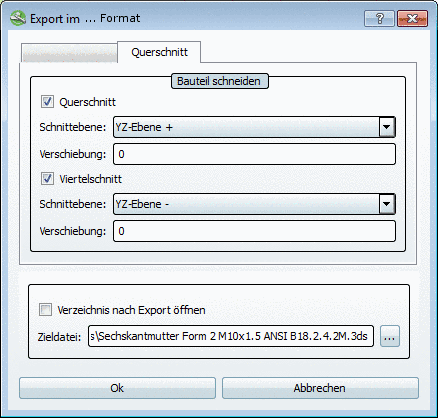
Make the settings on the below described AVI options and Cross-section tabbed pages:
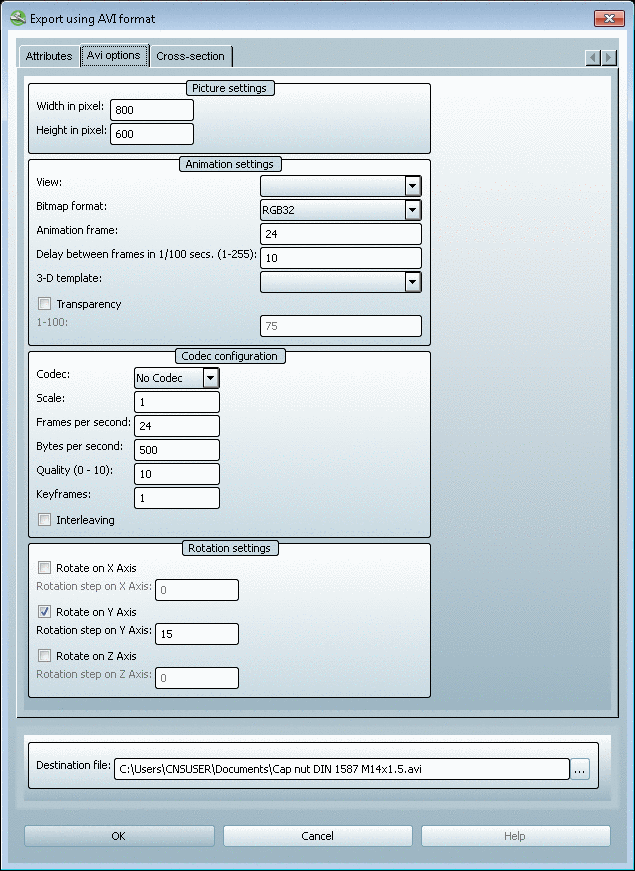
-
-
Usually leave the default value "RGB32".
Otherwise select the desired bitmap format from the list field.
-
![[Note]](/community/externals/manuals/%24%7Bb2b:MANUALPATH/images/note.png)
Note Please note the interaction of the settings under Rotation settings.
If you set a rotation step to 1°, you will need 360 frames per rotation, so that a full rotation may be carried out.
-
Delay between frames in 1/100 secs. (1-255)
The rotation speed is a result from this setting and the Animation frame setting.
-
You can adjust the color style to the layout of PARTsolutions versions, CAD systems and other style sheets:
8.1, 9.0, Purist, Metal, Wood, Catia V5, Solid Edge, SolidWorks, NX, One Space Designer, Pro/Engineer, Inventor
-
In order to get a transparent background, activate this option.
-
-
From the list field select the desired Codec.
The setting No Codec offers the best quality. However, without Codec you get very large files.
Select a Codec from the list with which the quality and file size are in the desired relationship.
-
Scale: Default value '1' (lowest possible value)
Time scaling. The larger the number, the slower the movement.
-
The more frames per second, the smoother the movement, but also the larger the file.
-
Usually you leave this setting. Changing to '2' would cut the number of key frames in half.
-
-
Optionally, you can define the rotational increment in degrees for individual axes.
-
Via Browse the Explorer opens.
If desired, change the path and the file name. Either way be sure to leave the file ending.


All parts from CADENAS catalogs can be displayed as 3D solids in the widespread Adobe PDF format. Parts ad assemblies can thus be displayed in 3D on all computers worldwide with a free standard license from Adobe Acrobat Reader (as of version 7.0.8). It is therefore possible to get a realistic view of the part prior to purchasing it.
The application range of Adobe Acrobat 3D are 3D processes of coordination, in other words better cooperation with technical documents through the integration of 3D data, shorter development times due to clearer 3D designs and the avoidance of construction errors. A further area of use is the technical documentation. The 3D design data can now be displayed on any desktop without the use of CAD applications and the preparation of the CAD data for marketing and technical documentation is easy as pie.
Compare also Section 3.1.2.1.2.5.3, “Export PDF datasheet ”.
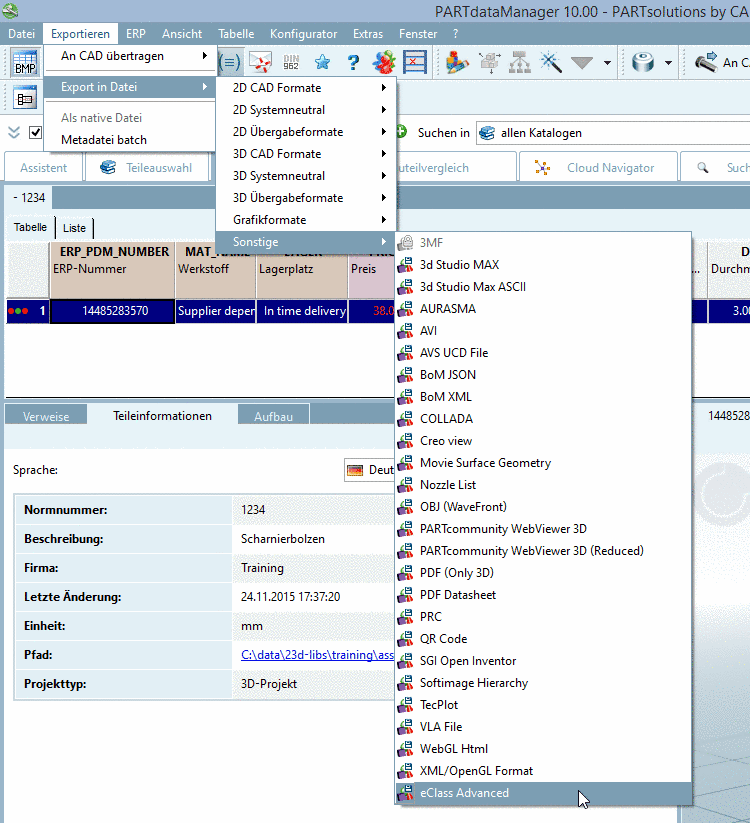
Via the Export menu, or the respective toolbar, select File -> Others -> PDF (Only 3D).
-> The Export in PDF (Only 3D) format window opens.
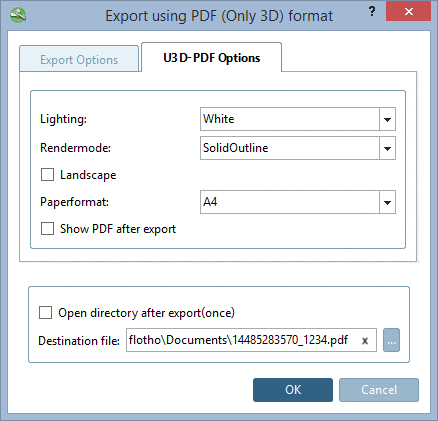
Some setting options of the Acrobat Reader can be performed in the dialog box.
Under Destination file, define the name and storage location of the file.
Details on the tabbed page Export Options can be found under Section 3.1.2.1.2.5.6.1, “"Export options" tabbed page -> Export accuracy ”.

In order to be able to export CADENAS parts from PARTsolutions as 3D PDF, you need a license for the Acrobat interface,but not a full license for Adobe Acrobat 3D.
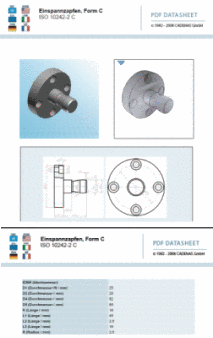
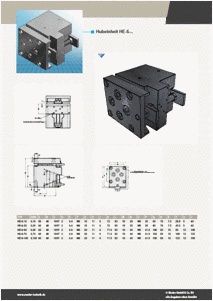
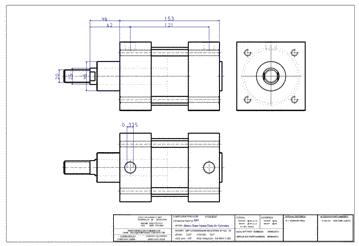
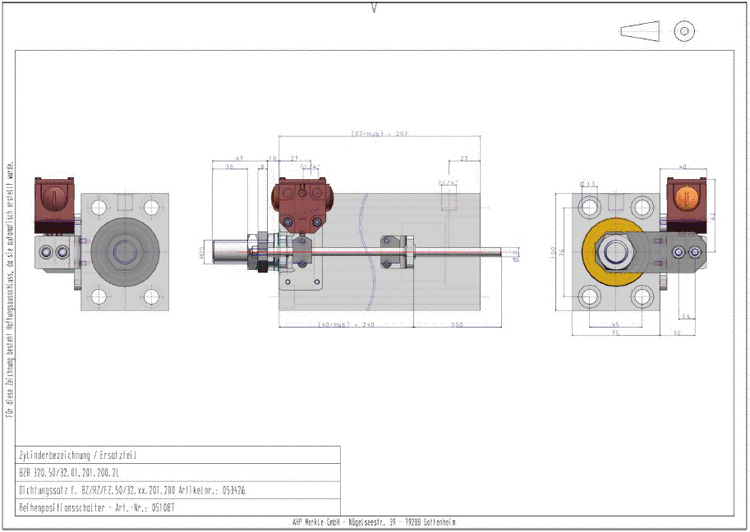
The 3D PDF data sheet was developed for the platforms PARTcommunity, PARTserver and PARTsolutions (as of V8.1.08) (as well as Offline CDs). Using the data sheet function, a 3D PDF document can be created from an online catalog or from a local installation. The view can contain a 3D model, 2D view with dimensioning and photo-realistic images, a characteristic attribute table, and many more characteristics.
Important for catalog manufacturers is that no changes must be made to the catalogs when creating 3D PDF data sheets, because the data sheet is automatically loaded into the already existing eCATALOGsolutions catalog data.
Due to the unique data sheet definition, the 3D PDF data sheet is mainly interesting for the end user. All catalogs at all PARTsolutions workstations produce identical worksheets which drastically improves internal documentation. In addition, all 3D PDF data sheet users receive all information in an summary which greatly supports product selection.
After creating the 3D model the data sheet is immediately available and through the support of the 3D function, exhibits and innovative method with a low error rate.
The 3D PDF data sheet is available in several languages for PARTcommunity, PARTserver, PARTsolutions and Offline CDs.
In order to create the 3D PDF data sheet, a layout template must be defined. This contains information on how the data should be arranged on the PDF.
The templates are filled with Standard text, Standard number, preview images, U3D image (interactive 3D view),[83] technical previews, 2D derivations, table values, etc.
Adobe Acrobat Reader Version 8.x is recommended when using 3D functionality.
All displays correspond to the table row chosen during export.
In the PDF data sheet the option Shaded view can also be selected for the 2D derivation. The creation is much quicker and is a good alternative, because no real line depiction is needed.[84]
You can display the Windows user name and the mass of the part/assembly in the PDF data sheet. The mass declaration is important among others, in order to be able to calculate the carrying charge. The user name is interesting for company internal data sheets e.g. at incoming orders, when the data sheet is enclosed to the order.
-
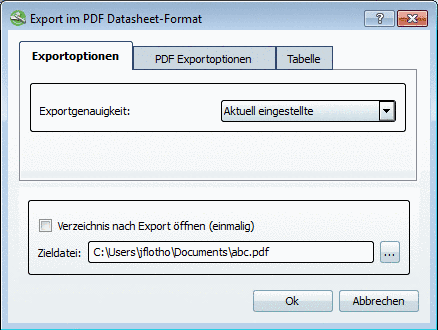
Open the export format in PARTdataManager via the icon PDF Datasheet
 .
.-> The dialog box Export in PDF datasheet format opens onto the PDF export options tabbed page.
-
The standard selection Use default-template is activated.
If company standard templates are available for the currently selected catalog, you may select these from the list field Plane, otherwise please select Cadenas.
-
Overwrite derivation view from template:
Is the option set, the setting is under Derivation view in the list field will be used.
Is the option not set, the presetting from the template will be used independent of the setting under Derivation view. If no presetting has been made in the template then the setting under Derivation view in the list field will also be used.
-
-
Table tabbed page -> Remove column from table:
On the Table tabbed page you can remove columns from the table for the data sheet view. Activate the checkbox for all columns which you do not want to be displayed.
-
Under Export options optionally adjust the Export accuracy.
In the list field select the desired accuracy:
The part is calculated with the set level of detail before the export.
This function is identic with the level of detail option
 in PARTdataManager, but here only temporarily
for the export.
in PARTdataManager, but here only temporarily
for the export.


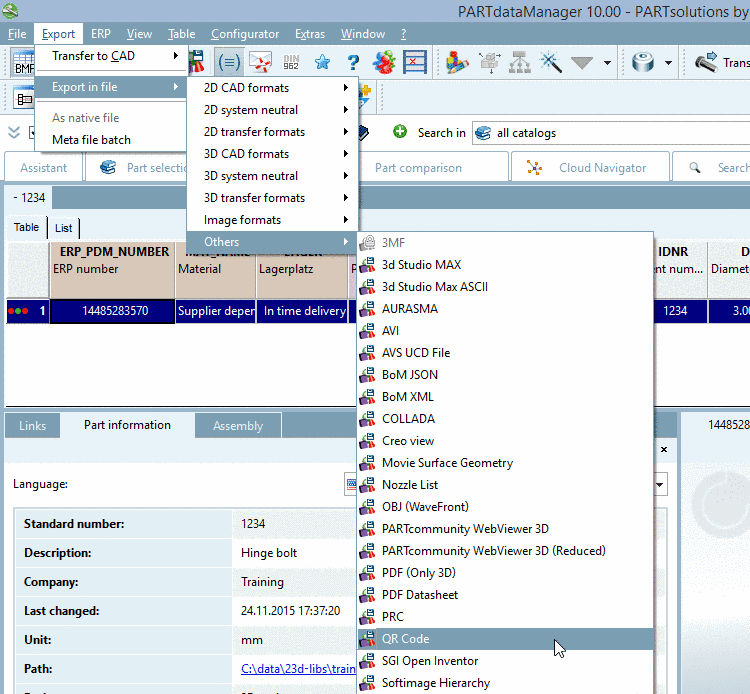
In order to export the QR Code for a single project proceed as follows:
Call: Export menu -> Export in file -> Others -> QR Code
Settings on tabbed page QR options:
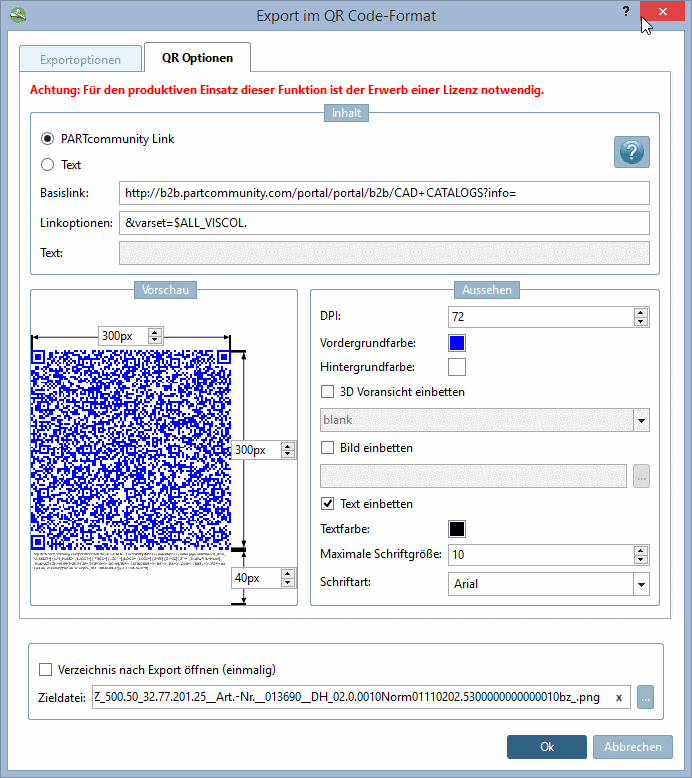
Information used in the input fields Base link, Link options and Text are embedded in the code. Part parameters such as $NN., $NT., $NB., $ALL_VISCOL. (all visible parameters), $ALL_COL. (all parameters), $ProjectPath. (project path) can be used.
-
If PARTcommunity link is selected, then base link, project path and link options are automatically combined.
-
If Text is selected you can create any combination. This may be links or other texts as well, which shall be saved in the QR.
Link to your own home page with order number BNR (from table)
http://www.my_company.com/showproject.asp?NR=$BNR.
Settings on tabbed page Export Options: See Section 3.1.2.1.2.5.6.1, “"Export options" tabbed page -> Export accuracy ”.
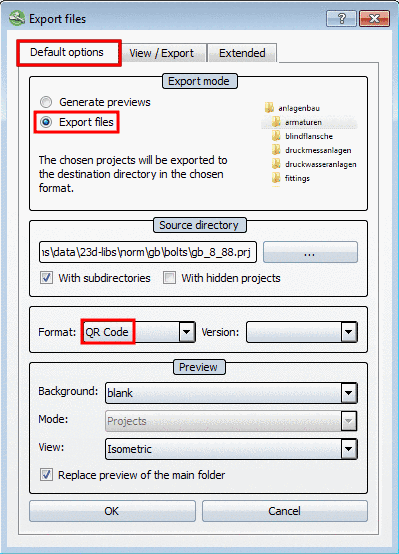
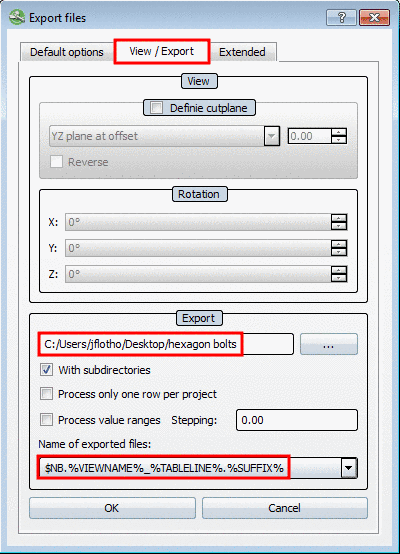
You can export the QR Code for complete directories:
-> The Export files dialog box opens.
Select the export mode Export files.
|
|
Under Export select the target path and possibly adjust the presettings under Name of exported files. |
If in a pre-process eClass Advanced attributes has been enclosed in the project you can now export this information in the form of a XML file.
-> The respective XML file enclosed to the project is exported.
...
<FEATURE>
       <FTEMPLATE>
           <FT_ID>0173-1#02-BAD291#007</FT_ID>
           <FT_NAME>Direktmontage möglich</FT_NAME>
        </FTEMPLATE>
        <VALUE_IDREF>0173-1#07-CAA017#002</VALUE_IDREF>
        <FVALUE_DETAILS>Nein</FVALUE_DETAILS>
        <FID>323</FID>
        <FPARENT_ID>-1</FPARENT_ID>
</FEATURE>
...
Details on how to import eClass Advanced information can be found under Section 4.7.2.1.15.2, “ Import eClass XML file... ” in eCATALOGsolutions Manual.
In this section you can find the following formats of the Others menu item. At each format the available tabbed pages are listed, where you can perform settings. With click on the link you will reach the respective section.
-
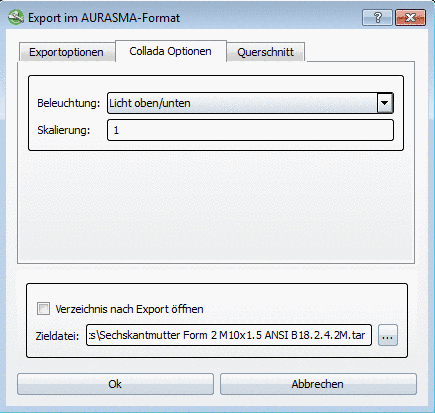
"Export options" tabbed page, "Collada options" tabbed page, "Cross-section" tabbed page, "Transformation" tabbed page
-
"Export options" tabbed page, "Cross-section" tabbed page
-
"Export options" tabbed page, "Cross-section" tabbed page, "Transformation" tabbed page
-
"Export options" tabbed page, "Collada options" tabbed page, "Cross-section" tabbed page, "Transformation" tabbed page
-
"Export options" tabbed page, "Cross-section" tabbed page, "Transformation" tabbed page
-
"Export options" tabbed page, "Settings" (BoM JSON)
-
"Export options" tabbed page, "Settings" (BoM XML)
-
"Export options" tabbed page, "Collada options" tabbed page, "Cross-section" tabbed page, "Transformation" tabbed page
-
"Export options" tabbed page
-
"Export options" tabbed page, "Cross-section" tabbed page, "Transformation" tabbed page
-
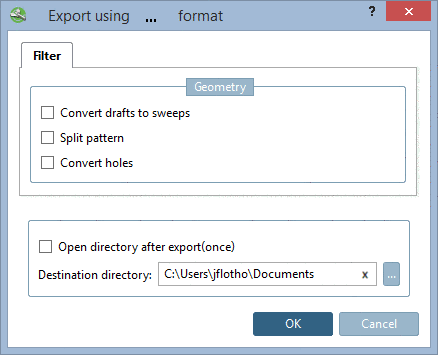
"Filter" tabbed page
-
"Export options" tabbed page, "Cross-section" tabbed page, "Transformation" tabbed page
-
"Export options" tabbed page, "Cross-section" tabbed page, Transformation" tabbed page
-
PARTcommunity WebViewer 3D (Reduced)
"Export options" tabbed page, "Cross-section" tabbed page, "Transformation" tabbed page, "Reduction" tabbed page
-
"Export options" tabbed page
-
"Export options" tabbed page, "Cross-section" tabbed page, "Transformation" tabbed page
-
"Export options" tabbed page, "Cross-section" tabbed page, "Transformation" tabbed page
-
"Export options" tabbed page, "Cross-section" tabbed page, "Transformation" tabbed page
-
"Export options" tabbed page, "Cross-section" tabbed page, "Transformation" tabbed page
-
"Export options" tabbed page, WebGL Html tabbed page, "Cross-section" tabbed page, "Transformation" tabbed page
-
"Export options" tabbed page, "Cross-section" tabbed page, "Transformation" tabbed page
On the Export options tabbed page you can adjust the Export accuracy.
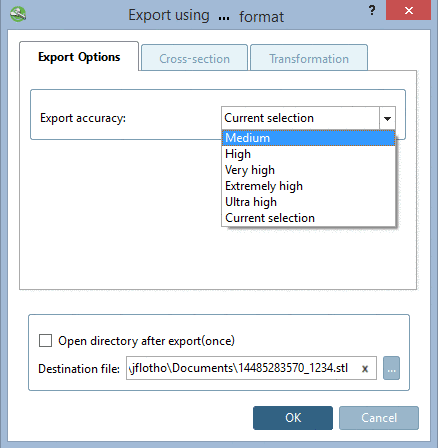
In the list field select the desired accuracy:
Before the export the part is calculated with the set level of detail.
The function is
identic to the level of
detail option in PARTdataManager, but here only temporarily for the
export.
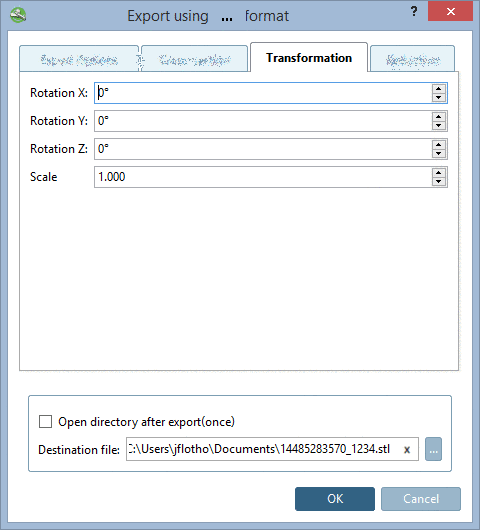
On the tabbed page Transformation, you can adjust the axis orientation and scaling for the exported part.
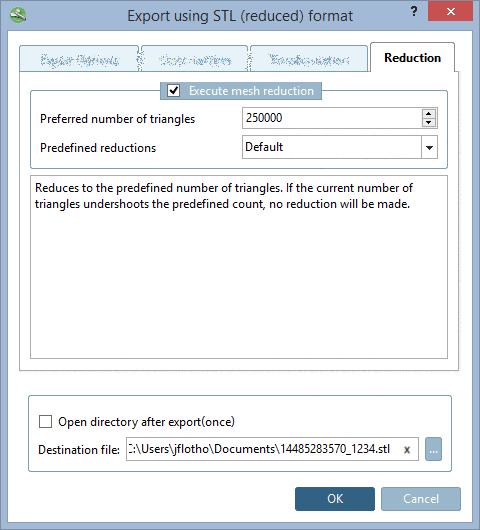
On the tabbed page Reduction, you can not only specify a certain number of triangles, but also the required result quality.
Default: Reduces to the predefined number of triangles. If the current number of triangles undershoots the predefined count, no reduction will be made.
Light: Light reduction. Great for a simple reduction of the face count of Parts. The topology will not be changed. Circles will be approximated by many faces.
Medium: Medium reduction. Great reduction of the face count of any Part. The topology will not be changed. Circles will be approximated by less faces.
Rough: Rough reduction. Great reduction of the face count of big or highly triangulated parts. Can destroy the topology of small parts and can lead to edged circles.
WebGL (Web Graphics Library) is a JavaScript API for rendering interactive 3D computer graphics and 2D graphics within any compatible web browser without the use of plug-ins.
Choose the desired top and bottom background color.
Optionally, create a hyperlink. The Hyperlink text is displayed on the webpage centered at the top.
Adjust the settings under Base link as needed.
When selecting the Text option you can specify free text in the Text input field.