Manual
Login
Our 3D CAD supplier models have been moved to 3Dfindit.com, the new visual search engine for 3D CAD, CAE & BIM models.
You can log in there with your existing account of this site.
The content remains free of charge.

Top Links
Manual
 |

-
Click on the arrow in order to open the list field with the project types. Select the desired type from there.
By selecting a type, a specific selection of tabbed pages shows up. You can find an overview on this under Section 7.8.1, “Overview on tabbed pages”.
-
Name of person that applied and/or is working on this project.
-
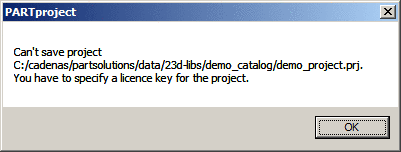
Basically you must enter the license key with which the respective folder (catalog) is secured against unauthorized access. On the highest level (for example: C:\Programs\partsolutions/23d-libs) this is not provided.
-
Short name (max. 16 characters):
![[Note]](/community/externals/manuals/%24%7Bb2b:MANUALPATH/images/note.png)
Note It is imperative that a Brief Description is given and if available (based on selected project type) the Table file.
The number character used should be oriented to the character limit of the "receiving" CAD system, since the short term is transferred as part name to the CAD during export.
The short name must be unique and should preferably include the DIN number and the value of the variable "NENN" (represented with a placeholder) (e.g. “D1587_$NENN.”).
-
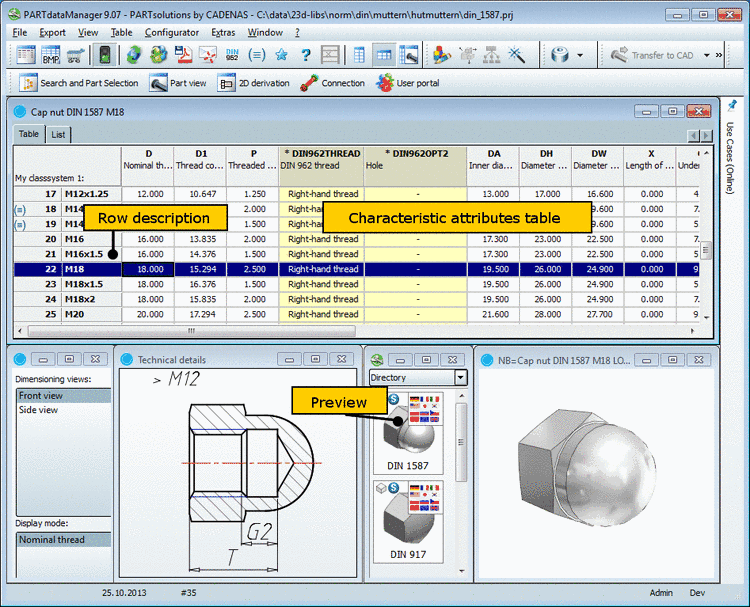
Row Label: ...is displayed highlighted in gray as the second column from the left in the table (see Fig. „Row description, characteristic attribute table, preview“). This retains your overview as to what component attribute you are dealing with in the relevant row even when scrolling to the right (the columns with the important identification variables would be concealed).
Information on the use of (translatable) text in the Row Label is found under Section 11.5.2.7.1, “Translation functions”.
-
Similar to standard parts (optional):
When cipping a catalog it is detected automatically, whether there are links to standards projects in NT, NN and NB. If this is the case, then the project is automatically assigned to the class of the found Standards project within the Standards classification.
A manual entry here in the field Similar to standard parts (optional) results in the same.
Projects classified in such a way are marked with the Standards icon
 in PARTdataManager.
When using an ERP integration directories and projects can be colored based on role definitions in addition.
Information on this is found under Section 5.11, “ Configure roles ” in PARTsolutions / PARTcommunity4Enterprise - Administration Manual.
-
Note If available (this is only the case for specific project types) the Table file must be specified.
The table file contains the Table, which you can see in the Part view of the PARTdataManager (see figure below). Set the respective file (*.tab, *.tac).
-
Preview is the Image displayed in Part selection in the PARTdataManager (see illustration above). Likewise, in the Left side you can see the Part view (see illustration below). Enter the corresponding file (*.pra, *.bmp).