Manual
Login
Our 3D CAD supplier models have been moved to 3Dfindit.com, the new visual search engine for 3D CAD, CAE & BIM models.
You can log in there with your existing account of this site.
The content remains free of charge.

Top Links
Manual
 |
You have eClass Advanced information available in the form of a XML file and would like to assign it to the adequate catalog projects so that the information is available in the PARTdataManager?
Integrate the eClass Advanced information via Import eClass XML file... command into your PARTsolutions catalog. The process will split the "large" XML file and assign the individual product information to single projects in the form of "little" XML files.
Precondition is the availability of appropriate mapping information.
The XML file contains the article number in the element <SUPPLIER_PID> (analogously to BMEcat specification).
<?xml version="1.0" encoding="UTF-8"?>
<!-- EXPORT_PROGRAM:  eCatCreator 1.2-->
<!-- File saved on:   15.05.2013  10:58:22 -->
<!-- XML Schema used: bmecat_2005onto.xsd -->
<BMECAT version="2005"
        xmlns="http://www.eclass.eu/2011/bmecat/bmecat_2005onto"
        xmlns:ns="http://www.eclass.eu/2011/bmecat/bmecat_2005onto">
  <HEADER>
    <GENERATOR_INFO>eCatCreator 1.2</GENERATOR_INFO>
    <CATALOG>
      <LANGUAGE>deu</LANGUAGE>
      <CATALOG_ID>reference data PS</CATALOG_ID>
       ...
  </HEADER>

  <T_NEW_CATALOG>
    <PRODUCT>
      <SUPPLIER_PID>1234</SUPPLIER_PID>

      <PRODUCT_DETAILS>
        <DESCRIPTION_SHORT>787-1001</DESCRIPTION_SHORT>

        <INTERNATIONAL_PID type="gtin">4050821298236</INTERNATIONAL_PID>
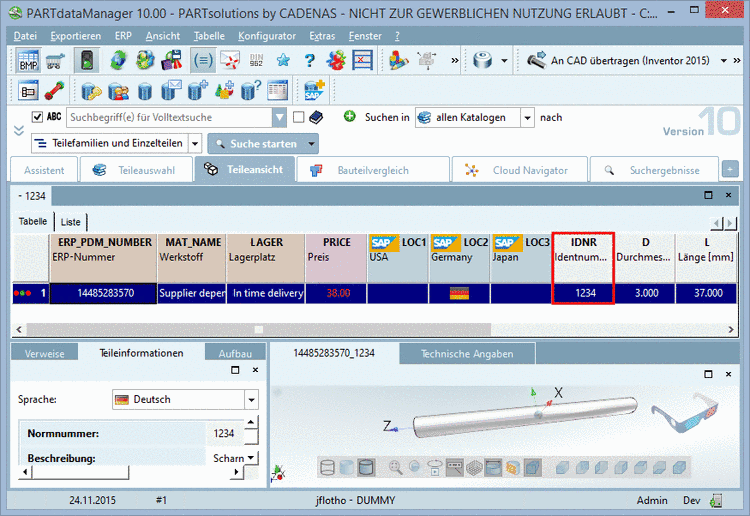
Your already existing PARTsolutions catalog also contains the article number in any table column (here exemplified IDNR).
-
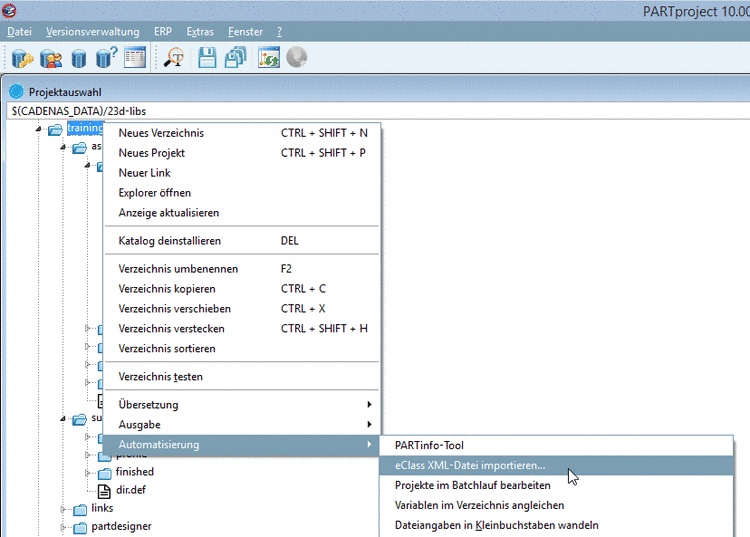
Select your catalog and call the context menu command Import eClass XML file....
-> The dialog box eClass import opens.
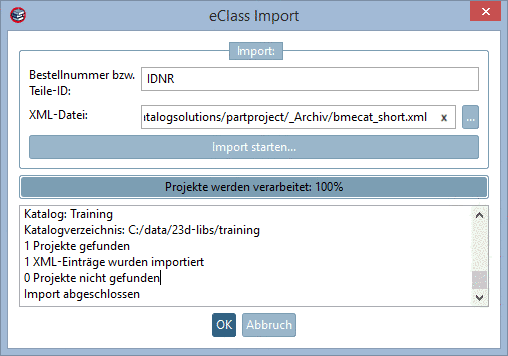
Under Order number or Part ID, enter the adequate table variable, which contains the number (here exemplified IDNR).
Choose the desired XML file by clicking on the search button .
At the end of process, in the log, Import complete is displayed.
-
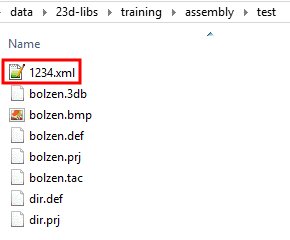
Open any project where an assignment has been performed.
You can see the assigned XML file. The naming is according to the article number.
-
Open a project in PARTdataManager and export the eClass information using the respective export command.
-> The respective XML file enclosed to the project is exported.
...
<FEATURE>
       <FTEMPLATE>
           <FT_ID>0173-1#02-BAD291#007</FT_ID>
           <FT_NAME>Direktmontage möglich</FT_NAME>
        </FTEMPLATE>
        <VALUE_IDREF>0173-1#07-CAA017#002</VALUE_IDREF>
        <FVALUE_DETAILS>Nein</FVALUE_DETAILS>
        <FID>323</FID>
        <FPARENT_ID>-1</FPARENT_ID>
</FEATURE>
...